Category: Uncategorized

Oct 16 2018

The Cozy 3 project

Today starts a new direction of my life….

I brought my Cozy project home from the airport and now it is time for me to finish it. member what the heck I did in case someone asks in the future.

The plane has the following completed. The canard, the wings, the main fuselage. I’ll need to build a new nose, the turtle back, engine cowls and complete the installation of all the systems (heat, controls, wiring, engine, etc).

Overall, I am somewhat excited about getting started. The work provides me with a singular focus to my work days and keeps me engaged with the latest technology. I really like having big project to complete and this is a hell of a big one which will consume years of effort. Yikes, what have I gotten myself into?

IMG_7249-2018-10-16-11-10.jpg

Jan 25 2016

Headrest panel supports

Today, I want do install the standoff supports for the back head rest panel.

wpid-IMG_3993-2016-01-25-20-43.jpg

In order to do so, I built a quick jig to simulate the panel with standoffs (to get the proper distance from the firewall) with a hole in it to reach through)

wpid-IMG_3985-2016-01-25-20-43.jpg

Hot glue the panel to the firewall, butter up the supports and install them on the back side. Easy.

wpid-IMG_3984-2016-01-25-20-43.jpg

Installed with nut plates.

wpid-IMG_4096-2016-01-25-20-43.jpg

Dec 19 2015

Hinges installed

The top was cleo aligned to the door

wpid-IMG_3810-2015-12-19-20-40.jpg

The hinges were installed

wpid-IMG_3812-2015-12-19-20-40.jpg

I now have nose door. I wanted to make a nice sized opening to all for travel storage in the nose. Moving the battery to the back spar removed 18 lbs of dead weight and 15 lbs of heavy battery cable. I’ll needs to moved my tools and extra junk to the nose for balance. A win-win in my book.

wpid-IMG_3816-2015-12-19-20-40.jpg

Dec 15 2015

Door construction

Glass was placed in each of the for corners of the door to all for cleo position alignment after the door is cut open.

wpid-IMG_3761-2015-12-15-20-26.jpg

I did not light the glass J hinges. The alum ones were twice the weight after drilling, but much stiffer.

wpid-IMG_3774-2015-12-15-20-26.jpg

Used a dowel to hold the hinges parallel and straight for bonding into the top.

        wpid-IMG_3775-2015-12-15-20-26.jpg

Dec 01 2015

Forming the sides

Today I glassed part of the bottom. I thought it was an easy area to get to.

Learned:
In hind sight I probably should have waited to glass the bottom. The problem is water drainage. Since I sealed this part of the bottom, I have to have additional drain holes to accommodate the forward compartment.

wpid-IMG_3599-2015-12-1-17-26.jpg

I discovered an easy way to slot the foam and PRE-curve the sides. A little sand paper glued to a sanding board is an easy way to make slots in the curving the foam .

wpid-IMG_3625-2015-12-1-17-26.jpg

Then using the side templates,
wpid-IMG_3620-2015-12-1-17-26.jpg

It was easy to curve the foam and lock it in place with some pour foam. The great thing about curving the foam this way (slots) it is a good way to tell how far you sanded into the foam. When you sand and reveal a slot, you have gone deep enough into the foam and had better stop.

wpid-IMG_36021-2015-12-1-17-26.jpg

The sides had some spring back.

Learned:
Next time I would make the templates a bit MORE curved to allow for this characteristic.

wpid-IMG_3627-2015-12-1-17-26.jpg

The foam is being fitted to the sides.

Learned:
One should bond the sides to the templates (pour foam), to hold them in place and THEN attach them to the sides to lock them in position. They would be perfectly positioned with no spring back.

wpid-IMG_3618-2015-12-1-17-26.jpg

Learned:
Spent too much time planning the size of the bulk heads. I trimmed them when I fitted the sides anyway.

Nov 29 2015

Week 3 Report

Hours worked: 39.9        
Total hours: 117.7

Average hrs/wk: 37.2

Notes: none

Nov 27 2015

Glassing the Cone

Here you can clearly see the tearing of the foam from pushing the rod though. You can also see the pitot tube and how it will be mounted.

wpid-IMG_3545-2015-11-27-19-17.jpg

I added a small defuser after the Al pitot tube to smooth the air as it flows around the tube. Why? I don’t know, just a bit anal and it was easy to do.

wpid-IMG_3547-2015-11-27-19-17.jpg

glass was cut (1 layer bid) wetted out on the table using plastic on each side.

wpid-IMG_3554-2015-11-27-19-17.jpg

The part was glassed. When the foam is removed, I should end up with a defuser cone, with 3 ribs holding a pitot tube in the center. I won’t really know the final result will be until the the entire nose is build with the cone encapsulated in the glass….

wpid-IMG_3557-2015-11-27-19-17.jpg

Lessons learned:

I glassed the cone all at one time is a major PITA and I am concerned that the glass work inside (holding the pitot in place) will not be as straight or perfect as I want it.

Next time I would glass the ribs separately on the table (nice and straight), then flox the ribs to the pitot (using the foam a guide). Cure. Paint the ribs Black.

Mark and cut the ribs to the outside of the foam cone. Reassemble the cone, add a small amount of micro to the end of the ribs then glass the outside with carbon.. I would end up with a cone that all black.

It would add a few more steps but the end result will be perfectly straight ribs in the center and fillets on all the support ribs… and a much better looking product.

Build time 3.5 hrs.

Jul 04 2013

Happy 4th of July

Today I spent most of the day learning about my new canon camera. It was fun meeting new people, taking 370 pictures and trying to understand what all the setting are on the camera.

I find the hole subject of photography just fascinating. I used to take LOTS of pictures when I first joined the navy (in my teens). It was a time when 35mm film cameras and slides were the big thing. A fun weekend night was to gather a group of friends, drink till you were crazy, listen to Pink Floyd and watch slide shows of ones travels. Now we call it a Power Point presentation, use the Apple iTV to view the pictures on the big screen or just share your life on FaceBook. Probably healthier than what I remember doing

Over time, true 35 mm film cameras went out of vogue and were replaced by canister camera, disk cameras, 1.2 mp digital cameras eventually good quality “Point and Shoot” digital cameras and the iPhone 4S. I have always felt the picture output of these cameras was ok but have never really been pleased with the photos. I missed the ability to see through the lens, adjust aperture, focus, speed of film and just being creative.

That brings us to the affordable DSLR (digital single lens reflex cameras) of today. The technology has radically changed and sensors, lenses an processors can now give the same experience as film cameras of the past.

Frank (my aerial photographer friend) reawakened an interest in photography. In the world of iPhones and cheap cameras, I sort of lost focus on real photography. Mainly I was documenting events in my life… just taking pictures.
A snapshot in time. After spending time shooting with Franks equipment I also knew I needed something more capable than my cell phone and point and shoot camera if I really wanted to get into this hobby again.

Photography It is much harder than one would think. As started I studying the subject I found I starting to develop an eye for great photos and it is easier to see why some work and others don’t. Some of the great photographers are really amazing at conveying an idea, an image, a look which is inspiring. I have come to the realization:

  1. The optics of the lens, the type of sensors and processors of the cameras, lighting and flash is surprisingly technical. The choices in equipment, camera manufacturers and suppliers is boggling. Lots of research needs to be done to make a informed choice before buying.
  2. Operation of the equipment is highly technical. I have 2 DVD’s a number of books just to learn how to use the features of this Canon camera. It is not easy to master, but worth the time.
  3. Learning how to post edit the photo in different software packages.
  4. Just learning how to focus has been a challenge. This camera is crazy good at focusing, but the key to a good photograph is managing the camera so it focuses on what you want.
  5. Determining out what area of photography you WANT to be good at. So many areas to specialize in: portraits, sports, wild life, night, stars, weddings, groups shots, flash photograph, studio photography, pets, etc. The list goes on and on. Each interest requires a different skill, different equipment, different lenses and knowledge of the subject to take a good photograph.
  6. Framing/positioning subjects alone is an art. Sometimes it is chance which makes a great photo, sometime is just dumb luck. Mainly it takes the skilled eye of the photographer to bring out the best of a subject.

My first attempt was buying a Sony NEX7 from amazon and subsequently returning it. It had amazing color but the focusing and clarity just didn’t seem to be spot on for me. I would say at least 50% of my shots were clear, but not sharp! I had been spoiled by the clarity of my old Minolta 35mm film camera.

After some further research I found the Canon 7D. It had fantastic specifications/focusing/clarity review and it was the model I was seriously looking. My only reservation was the weight (it is heavy). When Frank found one on Craig’s list (a very good deal) I made a lowball offer and it was accepted! Such a deal, I couldn’t refuse!. Boy, I am glad I returned the Sony. The clarity and focusing ability of the 7D is phenomenal. It did a lot of test shots, and the Canon blows the Sony out of the water. Besides, it looks like a serious camera and subjects are more likely to agree to getting their picture taken if you look like know what you are doing ( a real stretch in my case).

I decided the first area I want to focus on is people. Portraits, kids, weddings, events, that sort of thing. It is my experience that not many people have really good pictures of themselves. Most cameras just don’t have the right size sensor or lens to really take a great photograph. I enjoy meeting people, talking them into taking their picture, and sending them the results. I give them a treasure they can share and keep, and they give me a good memory and lots of practice.

Today, it was off to White Point Gardens (the Charleston Battery) to learn how to make the best use of my new len.

wpid-IMG_8810-2013-07-4-19-30.jpg
Father and daughter

wpid-IMG_8883-2013-07-4-19-30.jpg
Medical student and girlfriend visiting CHS from Alabama for the 4th

wpid-IMG_8850-2013-07-4-19-30.jpg
Just having fun.

I ended up going to Isle of Palms on the beach to take shots of fireworks due to the absence of city lights. Normally, I don’t have much interest in fireworks, but now I have a reason to enjoy the experience.

These shots used a tripod, ES-50mm f1.4 lens using the self timer as my wired camera shutter release hasn’t arrived from Amazon yet. Still a lot to learn about preparation and staging. I forgot my flashlight and lost lens cap. I also need a wider angle lens.

Most were shot at ISO 100, f5 for 10-30 seconds. The longer the shutter is open, the more of the ground becomes visible due to the bursts of the shells.

What I like is the reflection off the water, and how the sand takes on the color of the fireworks burst.

wpid-IMG_8914-2013-07-4-19-30.jpg

wpid-IMG_8935-2013-07-4-19-30.jpg

wpid-IMG_8949-2013-07-4-19-30.jpg

wpid-IMG_8951-2013-07-4-19-303.jpg

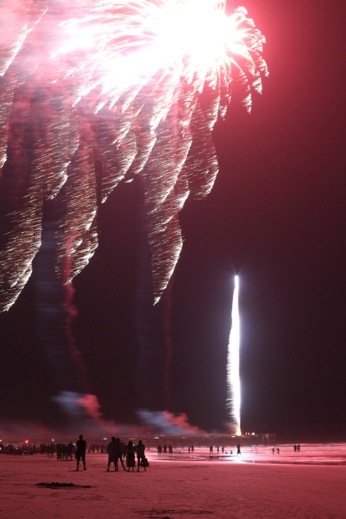
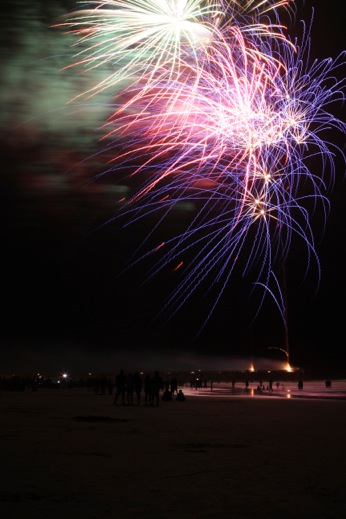
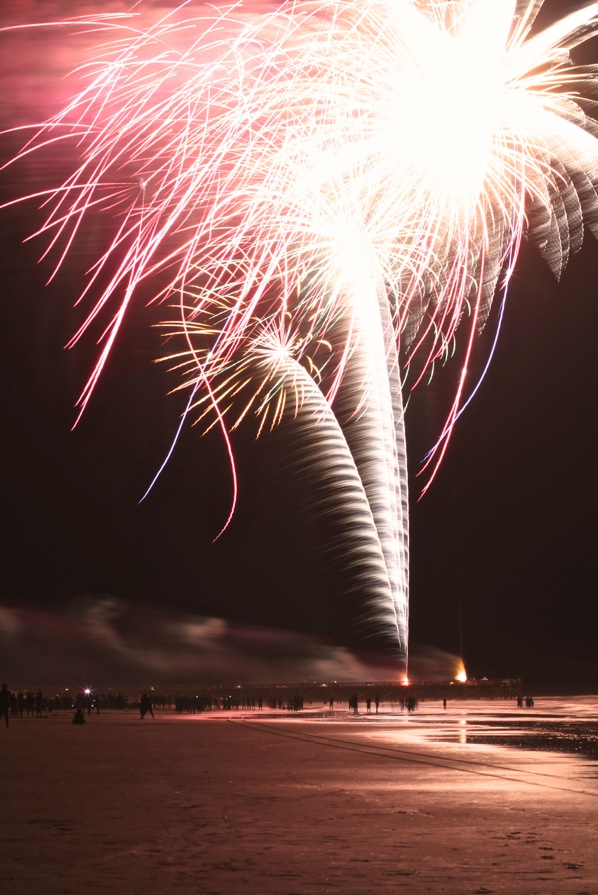
This is my favorite!

May 03 2013

Screening done

The screening is now done. Yeah, I can finally sit on the back deck again and not have to worry about bugs.

wpid-CIMG2432-2013-05-3-19-45.jpg

Now the end caps (covers) for the screening will be installed.

wpid-CIMG2458-2013-05-3-19-45.jpg

It looks great in the pool area now.

wpid-DSC00629-2013-05-3-19-45.jpg

May 02 2013

Screening the Deck

Today the screening has begun.

wpid-CIMG2428-2013-05-2-19-44.jpg