Apr
30
2011
After the splash was made of the leading edge of the wings, a flange needed to be made to support the lens. I used 4 layers of bid.

After wetting out the BID, it was placed in the wing splashes to set up.

Here you can see the splashes (left) the flange parts (right) lights and the 3 way supports for the lights to allow them to be aimed (adjusted).

Apr
27
2011
I decided to try a second type of earth bucket. The first type of earth bucket was a pain to make. I felt if I just used gravel (river stone) as a storage medium would make the earth buckets much easier to fabricate, although it would not store as much water.

I tested river stone (small stone) or the larger decorative stone. Much to my surprise the decorative stone held a little more water. A little over 3/4 of a gal. Yah! The river stone can be purchased for about $3.50 per bag and the two bags will make 3 earth buckets.

To make the bucket, a center tube (3″ pvc) is cut about 8″ long. I put tape across the top to prevent the rock from filling the “wick” tube. I then filled the bucket with gravel to about 1″ below the wick. Drill some holes in the side of the bucket at the top of the gravel layer to allow excess water to drain out.
I found it easiest to install the fill tube after filling with gravel . After inserting the fill tube, I covered the gravel with some weed barrier cloth, cut open the center tube to allow the dirt to fill the wick tube and filled the bucket with water. I am not sure if you really need to cover the gravel or if you can just put soil directly on the rock. I am sure the soil would not migrate into the rock area very far. Put in your plant, and fill the storage area with water and you are done.

The plane is looking good! Soon I’ll be flying her.

Apr
26
2011
Bob stopped by to check out my work….

The cowl bump out is done. Ready to flox on and micro.

Apr
25
2011
The cooler is test fit. Looks good.


Apr
24
2011
The glassing of the cooler is done. Now it is time to paint it.


Apr
23
2011
Today was full of awwww shits…. now that the wiring is done, it is time to go back to working on the engine. I need mod the oil cooler ducts and get some oil/fuel hose made up. Shortly after starting some unforeseen miss matches showed up.
With the top cowl on I dont have enough clearance on the oil dipstick! Shit the door wont close…

I ended up cutting the dip stick down to shorten it 3/4″
I also found the cowl hits on the front of #4 cylinder….shit. I didnt want to cut up the baffling (dont have the time) or remake the #4 cylinder box, so I just bumped put the cowl. Did want to do it but I had no choice.

After cutting the cowl out, I made a foam shape and glassed it in.

I also needed to make a new duct for the oil cooler since I changed the intlet and outlets. This is the shape of the old duct.

You can see how the tubes no longer match up.


I felt it necessary to come up with a inlet tube which uses NO SCAT tubing, and still allows the easy removal of the lower cowl.

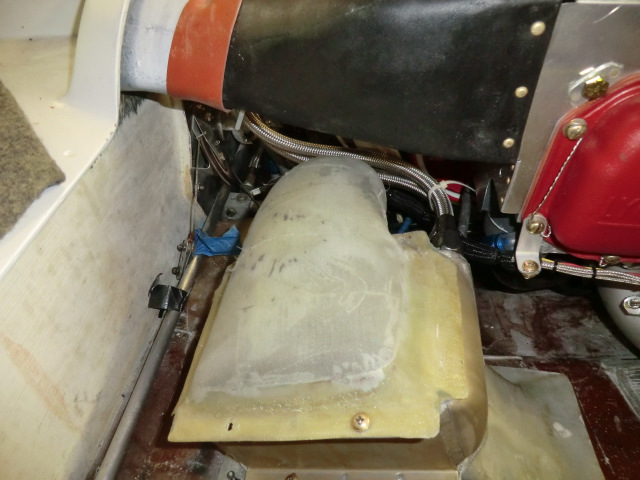
The cooler was encapsulated in foam and then carved it to the right shape. It is then covered in duct tape (black and red) to get ready for the glassing. This is the part of fiberglass work I really enjoy because it is very artistic.

Better get to glassing!
Apr
15
2011
The wiring is essential complete, but now begins the process of carefully checking out each system prior to energizing to ensure I dont hopefully fry and expensive piece of equipment when I power it up. During the last few days I have been hard at work trying work out the electrical issues.
Overall the hardest problem to get rid of was electrical noise in the entertainment system. I hate noise in the headset and will go to great lengths to get rid of it. Noise problems are especially prevalent in composite planes and have spent over two days figuring out what was causing it and solving the problem.
I found the stereo input to the com panel is super sensitive to almost any kind of noise. I had to make TINY Delron bushing on almost all the connectors (even electrically isolated jacks) to prevent noise. This a a picture of a a fairly large one bushing I made as a “storage” jack for the stbd side 1/8″ stereo jack. I also had to replace and move some of the wires to eliminate the problem.
I even found out when the input jack is disconnected from the GPS, just touching it or having it bump into something will cause a buzz in the headset. To prevent this I made a bushing to park the jack into.

The jack was installed in the the stbd ball mount.

When the input plug is not being used, the I can insert it into the bushing which prevents any noise.

After taking the electronic equipment in and out the plane a number of time, I found I could completely remove all the electronics from the dash to have complete access to all of the wiring behind the equipment in about 10 minutes.

The EFIS panels (since they are custom machined and back set in the panel) have to removed from the front. They are disconnected, turned sideways and come right out.

I love the ability to quickly and easily remove them to make changes to the wiring.

After spend many frustrating hours trying to get the ADS-B properly configured and all the computer systems to talk to each other, I am finally happy with the wiring, and now it is time to tidy up the wiring with tie wraps, button everything up and start installing the interior.
Apr
06
2011
While checking out the individual power circuits, I found a MAJOR mess up. When I originally designed the oil pan I had the fuel servo hanging up side down. Later I flipped it right side up due to space considerations. I didnt take into account the push-pull movement and I found out my throttle cable now moves in the wrong direction. Shit….

After thinking about it for a while I came out with a fix which works very well. I installed a SS shaft with a support bearing for the cable to attach to. This effectively reverses the movement of the throttle cable and now everything work correctly.

Today was also noteable as I finally powered up the EFIS panels.

It has been quite a chore in checking out the wiring and powering everything up. Just about every circuit has had some issue from missing grounds to connector broken wires issues which needed correction. Slowly everything is being checked out and put in service. Tomorrow it will be correcting an minor issue with the EFIS panels and starting on the radios which are the last to do. I want to have all systems up and operational by Friday or Saturday!
Mar
27
2011
Today was spent wiring up the back part of the radio stack. Sure is nice to tidy things up a bit.

Looking good now.

Mar
25
2011
After finishing up the hull wiring yesterday, I completed the connection of the remaining radio power and grounds today. I only found a few errors on the install which were quickly fixed.

The electrical power system is nicely cleaned up now.

As hoped for all the wiring is hidden for a nice clean look.

Tomorrow, it will be the last of the major wiring…. hooking up all the radio data lines to the hull wiring. When finished I can start the electrical tests in preparation for full system turn on, computer setup and programing of the data communications systems. Cant wait!


