Apr
26
2011
Cowl Bump out
Bob stopped by to check out my work….

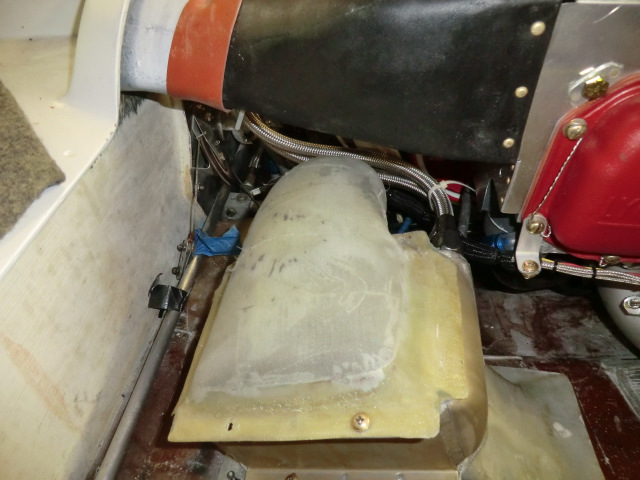
The cowl bump out is done. Ready to flox on and micro.

Bob stopped by to check out my work….
The cowl bump out is done. Ready to flox on and micro.
Today was full of awwww shits…. now that the wiring is done, it is time to go back to working on the engine. I need mod the oil cooler ducts and get some oil/fuel hose made up. Shortly after starting some unforeseen miss matches showed up.
With the top cowl on I dont have enough clearance on the oil dipstick! Shit the door wont close…

I ended up cutting the dip stick down to shorten it 3/4″
I also found the cowl hits on the front of #4 cylinder….shit. I didnt want to cut up the baffling (dont have the time) or remake the #4 cylinder box, so I just bumped put the cowl. Did want to do it but I had no choice.

After cutting the cowl out, I made a foam shape and glassed it in.

I also needed to make a new duct for the oil cooler since I changed the intlet and outlets. This is the shape of the old duct.

You can see how the tubes no longer match up.


I felt it necessary to come up with a inlet tube which uses NO SCAT tubing, and still allows the easy removal of the lower cowl.

The cooler was encapsulated in foam and then carved it to the right shape. It is then covered in duct tape (black and red) to get ready for the glassing. This is the part of fiberglass work I really enjoy because it is very artistic.

This lever is for the fuel purge valve which during a “hot start” is opened to allow cool fuel into the the fuel injection system to replace hot fuel. It will also kill the engine if engaged since the fuel is drained from the system. I built a lock to prevent the pilot from inadvertently activating the fuel dump. I would hate to be flying along and kill the engine at the wrong time.

While looking at the instrument cover (which I had taken great care to get the carbon fiber to line up ..just right..) I decided it just didnt look right so it was painted a flat black to match the dash. It looks MUCH better now.

The wiring is all tidied up and ready to go!

The dash is starting really come together now.

David stopped by to check out my work, have a beer and get a small circuit repair (broken LED). It was a nice distraction to my busy days.
\
Today I worked on “Earth Buckets”. I got the idea from my buddy Jerry who is growing lots of veggies in “Earth boxes“. It is a very cool product which mirrors natural hydrology principles to create a self watering growing eco-system.
I have terrible soil and sparse rain so I wanted to do some experimentation with grown veggies in such a system. Didnt want to pay the money to buy a bunch of Earth Boxes, so I came up with my own solution from a landfill waste stream. Earth Buckets.
The principal is: Water is stored in the bottom section, you fill the water reserve via a tube, water is wicked up to the main growing area via capillary action and you put GOOD grown soil in the top secton of the bucket. Easy.
I have been collection old 5 gal buckets on the side of the road to use as supports for the soil. I also purchased a bunch of buckets from Lowe’s because I wanted my garden to look consistent.

Drill a large hole in the bottom of the old bucket, then saw off most of the bucket to make the shelf and using some scrap PVC to make the tube for the wick and filler.

The assemble bucket. Simple. Be sure to drill a hole in the side of the bucket just below the soil shelf to allow excess water to drain out.

A bunch of the read for dirt and planting!

The wiring is essential complete, but now begins the process of carefully checking out each system prior to energizing to ensure I dont hopefully fry and expensive piece of equipment when I power it up. During the last few days I have been hard at work trying work out the electrical issues.
Overall the hardest problem to get rid of was electrical noise in the entertainment system. I hate noise in the headset and will go to great lengths to get rid of it. Noise problems are especially prevalent in composite planes and have spent over two days figuring out what was causing it and solving the problem.
I found the stereo input to the com panel is super sensitive to almost any kind of noise. I had to make TINY Delron bushing on almost all the connectors (even electrically isolated jacks) to prevent noise. This a a picture of a a fairly large one bushing I made as a “storage” jack for the stbd side 1/8″ stereo jack. I also had to replace and move some of the wires to eliminate the problem.
I even found out when the input jack is disconnected from the GPS, just touching it or having it bump into something will cause a buzz in the headset. To prevent this I made a bushing to park the jack into.

The jack was installed in the the stbd ball mount.

When the input plug is not being used, the I can insert it into the bushing which prevents any noise.

After taking the electronic equipment in and out the plane a number of time, I found I could completely remove all the electronics from the dash to have complete access to all of the wiring behind the equipment in about 10 minutes.

The EFIS panels (since they are custom machined and back set in the panel) have to removed from the front. They are disconnected, turned sideways and come right out.

I love the ability to quickly and easily remove them to make changes to the wiring.

After spend many frustrating hours trying to get the ADS-B properly configured and all the computer systems to talk to each other, I am finally happy with the wiring, and now it is time to tidy up the wiring with tie wraps, button everything up and start installing the interior.
Last night while working on the plane, I knocked out my front tooth. Shit…. I had a temporary crown on it and luckily I didnt swallow it!

A quick trip to my local dentist to have him re-bond it to my tooth and I was back at work! Hopefully the temporary will stay on until I get the plane to California and get the permanent crown intalled by Pat.
I have also decided that if the tooth comes out again, I will NOT have it re-bonded in and just go around with a hole in my smile, looking like a local southern boy. I want to see how people react to me as it should be fun and quite entertaining! Besides, not having my tooth in will motivate me to work harder and get the plane done. Certainly wont be able to get a date looking like this….
Today Charleston, SC celebrated the 150 anniversary of the beginning of the American Civil War.
At Patriots Point in Mt Pleasant a group of civil war reenactors camped out in a baron field and were having a great time.

Our South Carolina war fighters!


What fun…. sitting on stools hanging out and chatting. Kind of reminds me of what I do at Oshkosh (except we have lots of beer and roasted corn!)

What I really wanted to see was the firing of the civil war mortars. Later in the evening, the reenactors started firing all the guns (about 10 of them) in different combinations such as rapid fire, continuios fire, free firing, etc. It was loud and fun!

You can not see it very well, but Fort Sumpter is across the water and is what the solders would have shelled.


