Search: canopy seal

Apr 15 2021

Canopy Sealing V-Seal

I have found the V-seal to be incredibly effective. The main problem with most seal systems is over crushing of the seal and using Home depot house weather stripping to seal the canopy. It means your are ALWAYS fighting the seals to close and lock the canopy, over crushing of the seal, and the mis-matching of the canopy to fuselage causing air leaks where the canopy to longeron distance is too great. Imagine a car door. The door gaps are engineered for the seals. The seals are NOT just haphazardly chosen to fit on to hand made doors after they are made.

In order properly seal the canopy and make the canopy easy to close, you need to engineer the canopy for the seal. This requires a bit more effort than just throwing in a seal and hope it works. I have zero air and water leaks and the canopy is super easy to close and lock. So can you.

You do this by making a hard points which only allows a canopy to close down to a fixed point, “molding the canopy” to the longerons and THEN using the appropriate seals (V-seals).

Making a proper canopy seal.
1. remove all the existing seal.
2. stack washers on the front and aft end of the longeron where the canopy would hit the longerons making sure the outside of the canopy aligns with the fuselage. This limits the crush of the seals, aligns the front and back of the canopy to the fuselage, and ensures easy latching of the canopy hardware.
        3.        Drill the the place where the washers are stacked and make a permanent standoff of the same height (measure the height of the washer stack) for canopy closure. I just made a Al cup and used a AN3 screw. You can put a bolt with washers under it…whatever it takes to make a hard point for the canopy to close down to.

HPLongeron-2021-04-15-12-01.jpg

vseal-2021-04-15-12-01.jpg

Aft hard points:

HP2-2021-04-15-12-01.jpg

HP2aft-2021-04-15-12-01.jpg

4. Adjust your canopy closer hardware to this new canopy closed position.

The V-Seals (Any seals) require about 30% crush to prevent deformation. Since V-seals are about .250” high, this means about .190” opening (trough) for the seals to rest in. Since your canopy (like most) has an inconsistent gap distance you need to correct that. Since you have previously established a fixed hard point for the canopy to close to (the hard points), you can now mold a surface for the seals to rest in.

5. Cut some Luan plywood (its about .195’ thick) the width of your seal (about .25” wide), box tape the longerons, heat glue the luan strip on the tape and cover with another layer of box tape. Wax. Tape off your canopy tape off the area you dont wish micro to get on to. Slather some micro on the canopy, close and lock the canopy (to the hard points). After cure, open the canopy (this could be challenging, so mold short sections at a time). Clean off the over microed areas on the canopy you previously taped off.

NOW you have a molded trough to put your seal in that has a consistently .195” depth, and hard points which ensure the fuselage to canopy is properly aligned, and the latching mechanism is easy to use.

IMG_2009-2020-08-29-12-12-1-2021-04-15-12-01.jpg

Glue your V-seal in place. The best way I found is to wipe the back side with MEK or some cleaner, and glue in place with Pliobond adhesive. The seals will never over crush, they will open up with differential air pressure to prevent leakage and the canopy will be very easy to close and lock.

Overall, it is a weekend project. My canopy to longeron is within .010’ around the entire perimeter (Yes I checked), and I have never had to adjust the hardware or had air leakage. Additionally, I never had to readjust the canopy closure latches. They are always smooth and easy to latch.

Apr 30 2010

Canopy Latch done

The rotary canopy latch system was installed today.  It required the construction of a new main latch hook because I wanted to keep the rotary latch as far away from the instrument panel as possible.  I’ll paint it black to match the anodized parts.  When the plane is in Calif it can be taken off black anodized there.

After a bit of frustration adjusting the remaining half latching hooks everything is working smoothly now.   I temporarily installed the RAM mount (with my iTouch).  Almost anything can be installed on this mount (696, iPad, Droid, whatever) since it was glassed into the plane with a large backing plate.   All the wires are submerged in the foam so they will not be seen.   The LED spot light was also installed to check the clearances.  Everything ‘just’ fits as planned.

Two small canopy spacer hardpoints were constructed to control the crush of the canopy on the seals.  This prevents over-crushing of the seals thus causing a permanent of the seals.  These hardpoints also keep the alignment of the canopy and fuselage from changing when closed.   I think every plane should have them, but few do.

Aug 29 2020

LongEZ for Sale (Sold)

IMG_6909-2020-08-29-12-12.jpg

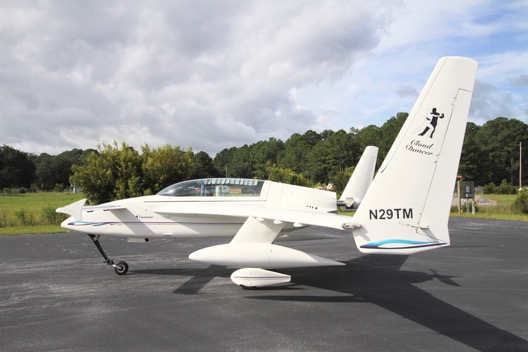
Sadly, today I am starting to market my plane. I have already had a few calls from interested buyers for Cloud Dancer. I have decided to put all the pictures here with details on the plane to highlight all the features and special additions to the plane. A few years ago I rebuilt and restored the plane which you can view on this blog starting here: Start of rebuilding N29TM

After being in this sport for 25+ years I really dont think there is a finer EZ out there and none with the ‘one of a kind’ features and additions I have added to the plane. I hate selling it, but I have a Cozy 4 project almost completed and its time to move on to a new plane.
IMG_6857-2020-08-29-12-12-1.jpg

Baggage pods are included.
IMG_6895-2020-08-29-12-12-1.jpg

IMG_6913-2020-08-29-12-12-1.jpg
IMG_6902-2020-08-29-12-12-1.jpg

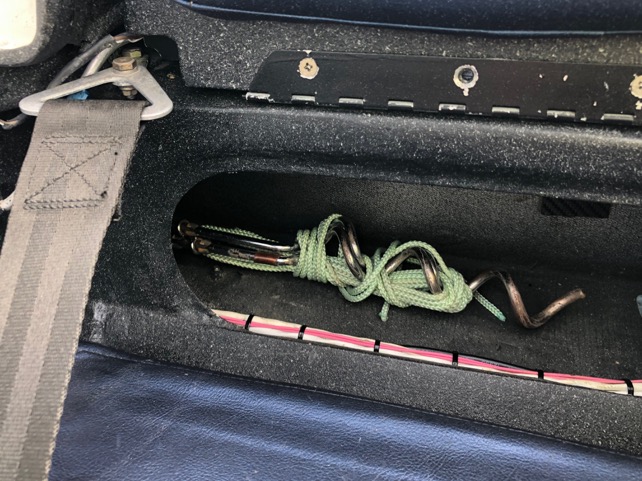
The Nose compartment where I usually carry tie down equipment, a tool bag and my travel cover. There is a placard for canard removal. All pitot and static tube is color coded. Red, pitot and yellow is the static system.

IMG_6919-2020-08-29-12-12-1.jpg

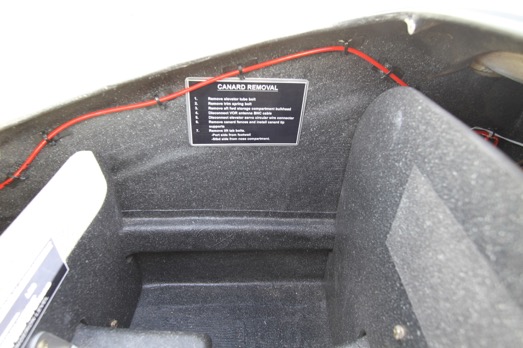
A warning placard which tells the pilot the nose MUST have enough ballast in its to stay on the ground when the plane is level. You will then be within the CG envelope.
IMG_6920-2020-08-29-12-12-1.jpg

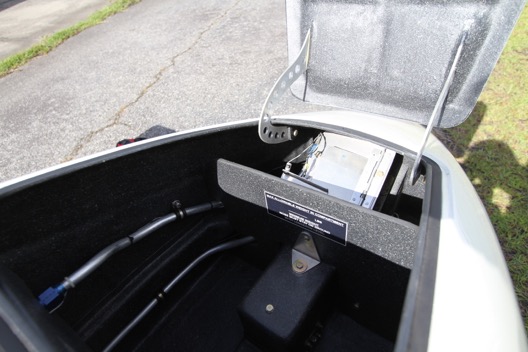
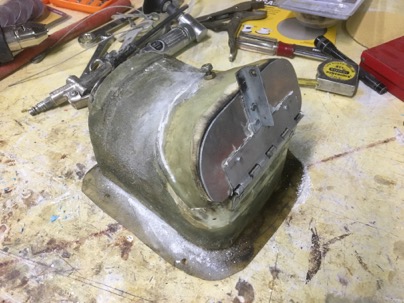
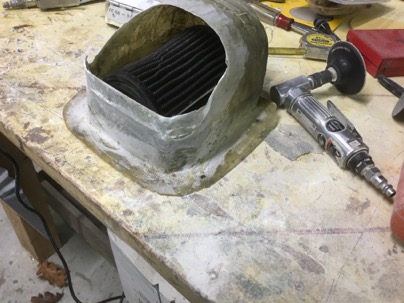
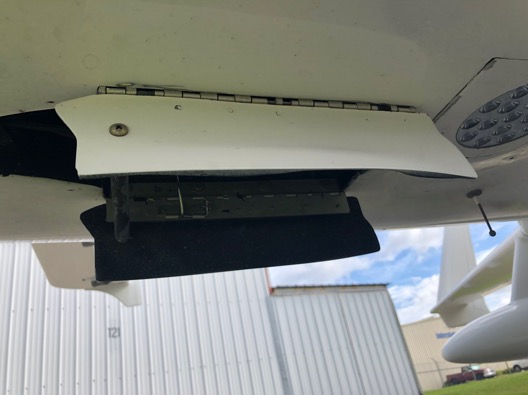
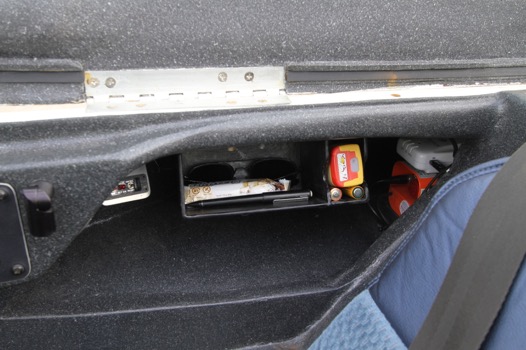
The compartment has bulkheads fore and aft to prevent interference with the control system. On the right you can see the Ram Heat system heater. I have a lot of information about concept of Ram Heat that I
developed on this blog, Here is an additional article I wrote for CSA about Ram Heat: Ram Heat Article
IMG_6921-2020-08-29-12-12-1.jpg
The compartment can actually quite a bit of stuff, as long as you stay within the CG range.

This is what I usually have in the compartment.

IMG_6918-2020-08-29-12-12-1.jpg

The Ram Air Heat inlet has a cover which attaches to the pitot tube when parked outside.
IMG_1984-2020-08-29-12-12-1.jpg

Nose gear doors.
IMG_1986-2020-08-29-12-12-1.jpg

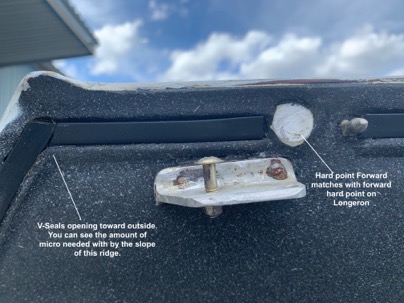
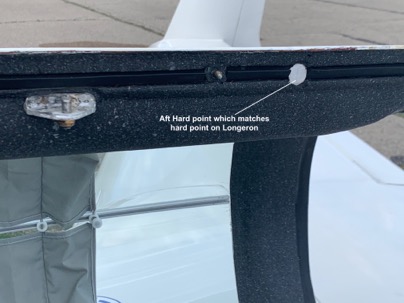
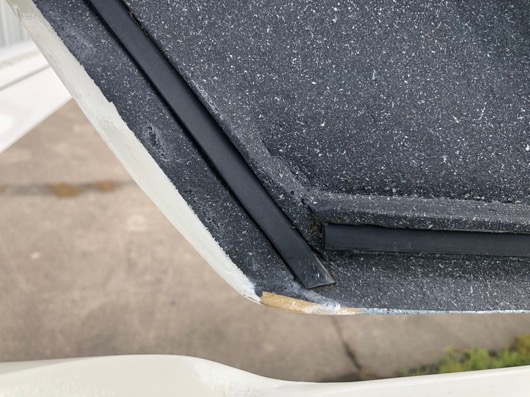
The seals for the canopy are in a molded track using LongEZ V seals. They seal the canopy with ZERO air leaks and no forced compression.
IMG_2009-2020-08-29-12-12-1.jpg

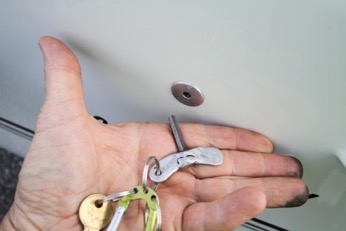
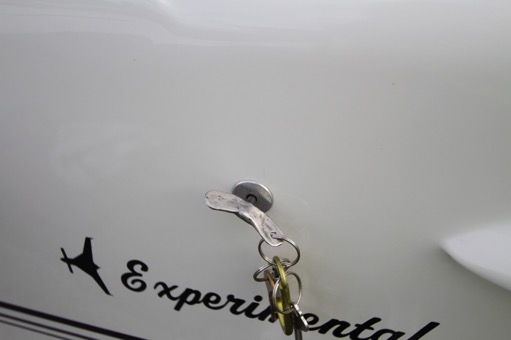
The canopy is secured by a rotary latch system.
IMG_6930-2020-08-29-12-12-1.jpg

The key for the canopy.
IMG_6931-2020-08-29-12-12.jpg

IMG_6932-2020-08-29-12-12-1.jpg

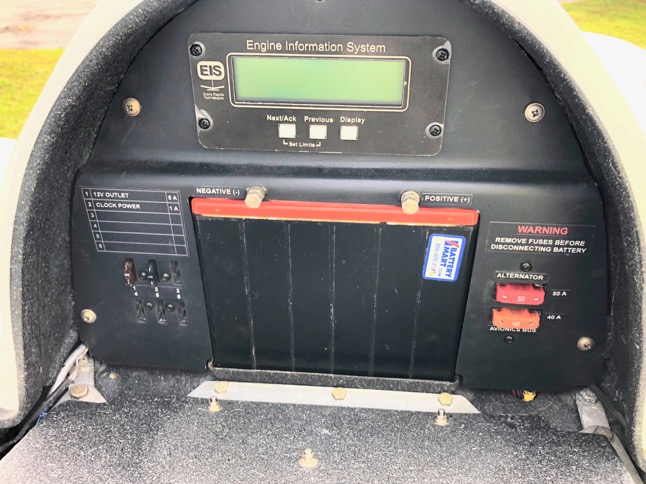
The fuse panel is located under the pilots seat for easy access. I have not had a fuse blow since I wired the system .
IMG_2004-2020-08-29-12-12-1.jpg

IMG_1999-2020-08-29-12-12-1.jpg

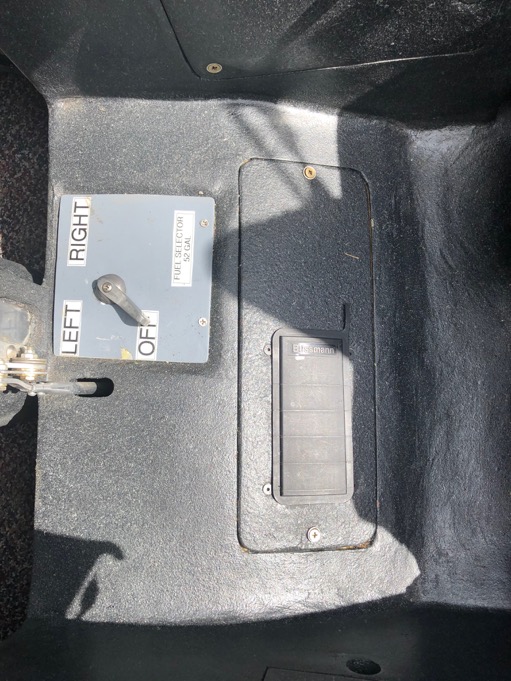
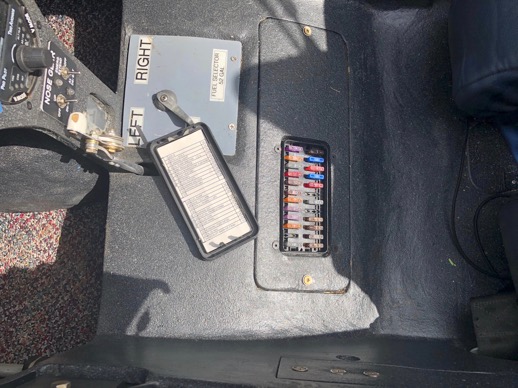
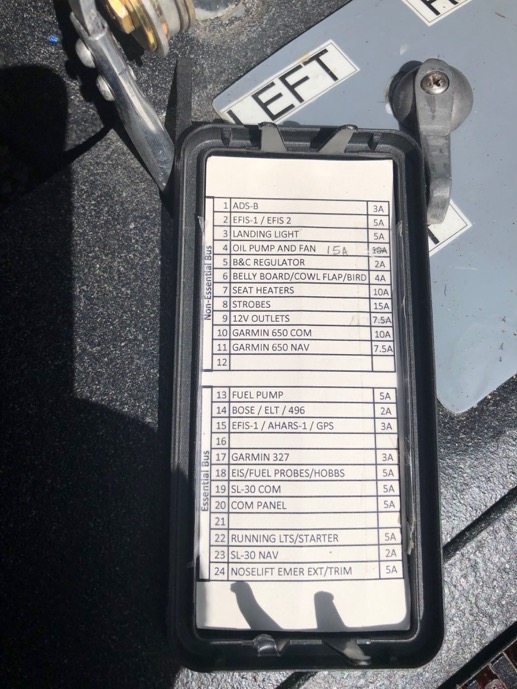
All fuses in the essential and non-essential buss are labeled.
IMG_2002-2020-08-29-12-12-1.jpg

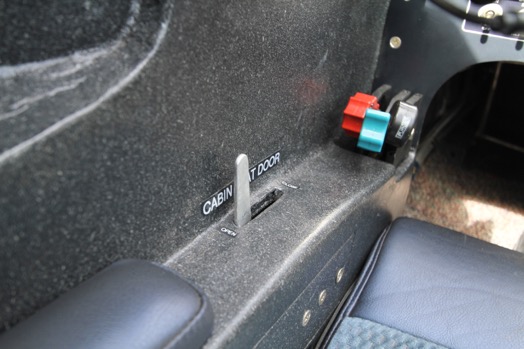
Heater control to close the air door of the heater air outlet when initially taking off on a cold day. After your engine oil heats up, turn on the pump, open the heat door for cabin heat.
IMG_69272-2020-08-29-12-12-1.jpg

Side panel for additional storage of a few items.
IMG_6934-2020-08-29-12-12-1.jpg

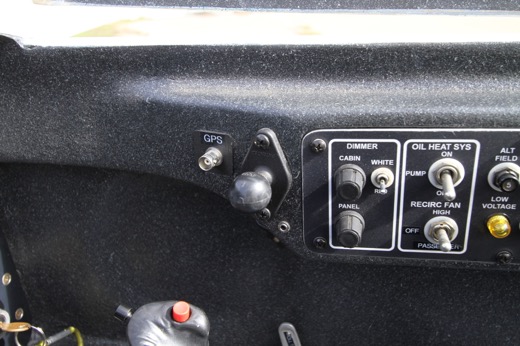
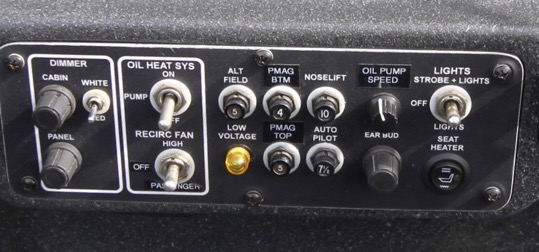
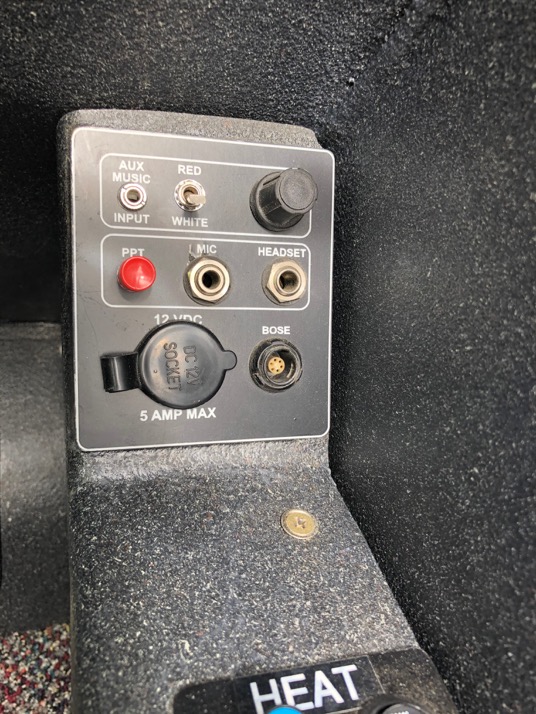
LED lighting (white or red) on a dimmer control for the pilot. 12 v outlet (switched).
IMG_2007-2020-08-29-12-12-1.jpg

Two usb outlets are available for the pilot. I have it set up for 2 Apple Lightening connectors to keep my iPad and iPhone charged in flight when using ForeFlight.
IMG_6948-2020-08-29-12-12-1.jpg

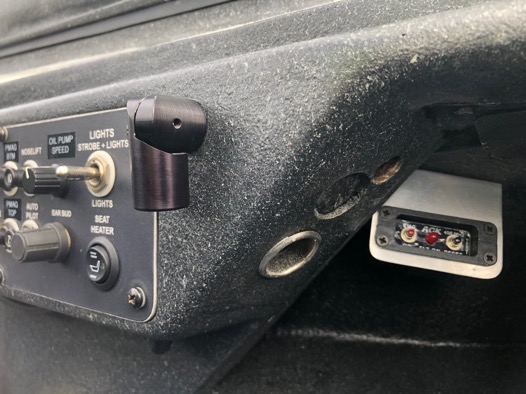
Ball mounts are located on the port and stbd sides. Each one has a 1/8” connector wired to the Comm panel for music input. This side mount has a BNC connection to a GPS antenna when I use my Garmin 496 attached to the mount..

Notice on the panel the Oil Heat Sys pump switch and below the switch is the Recirc Fan switch, which allows the pilot to turn on the rear heat fan in fast speed select the “Passenger control” of the fan which allows the passenger adjust the temperate in the rear off the plane.

IMG_6926-2020-08-29-12-12.jpg

Port ball mount with stereo plug input
IMG_6929-2020-08-29-12-12-1.jpg

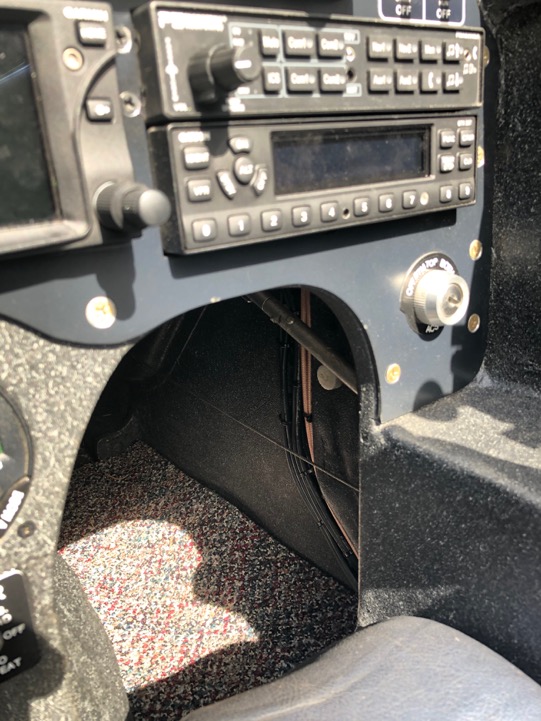
I hate looking at footwells and seeing LOTS of wires. It makes the plane look so unfinished.

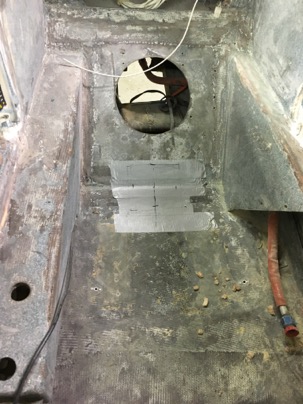
On the port side there is a fixed wire chase to hide the wires
IMG_1997-2020-08-29-12-12-1.jpg

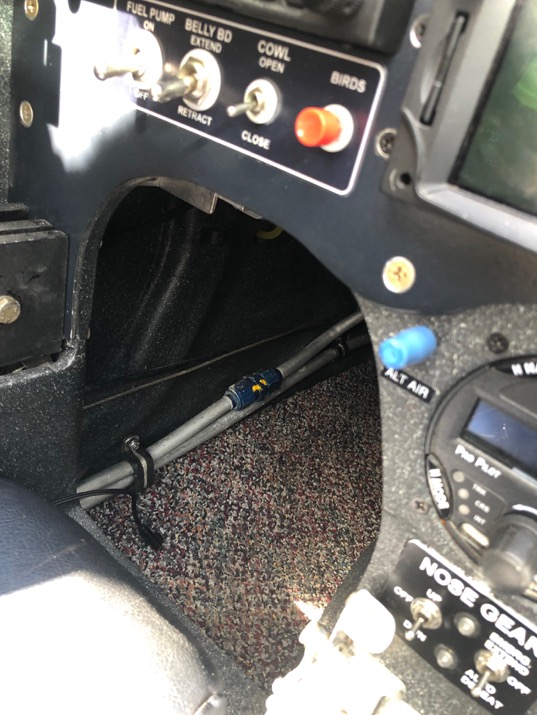
On the STBD side the wiring chase has a removable cover for the wires. Antenna wires are separated to prevent cross talk.
IMG_1998-2020-08-29-12-12-1.jpg

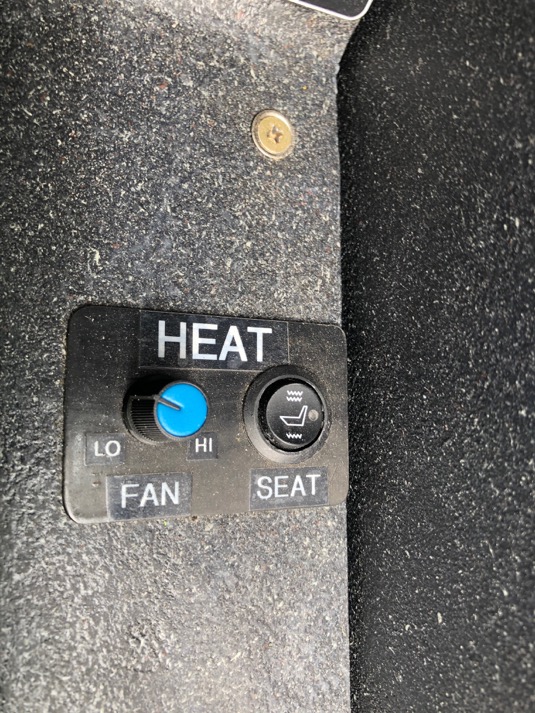
Along with controlling the heater pump speed (which controls the temp of the heater output) there is a seat heaters in the cushions (Pilot and passenger). I rarely use it as it quickly heats your butt up and normal only use it for a little while to warm up the comfort foam seats on a cold morning..
IMG_69223-2020-08-29-12-12.jpg

The Dash

Dual air outlets coupled to the COLD side of the Ram Air inlet. They are very quiet in flight. I like cold air on my face when my legs and body is warm to keep me awake.
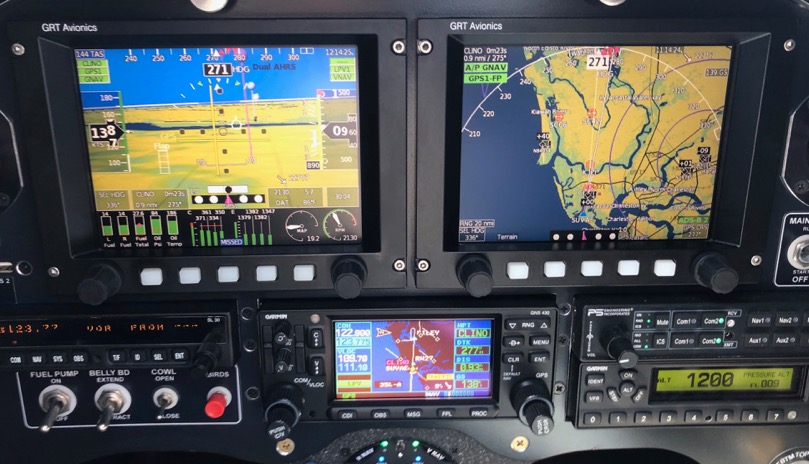
Dual Grand Rapids 6” HX displays.
Garmin SL-30
Trio Pro-Pilot Autopilot coupled to the displays via ARINC 429, or you can run it independently
Garmin 327 Transponder
NavWorx ADS-B IN and OUT
PS Engineering audio panel
The Garmin navigator allows for full IFR flying. You can do coupled to the autopilot via GPS, ILS or VOR approaches.
Wilhelmson nose lift with automatic extensions (the AEX option).
Electric belly board.
Bird beeper.
Dual USP inputs for each EFIS to allow for a mapping USB stick input for Seattle Avionics mapping data to be input to the EFIS’s.
ACK Dual frequency ELT. It transmits on 406 MHz and 121.5 MHz frequencies and provides position accuracy with the optional GPS input connected to the Garmin radio.

Picture of the dash while doing a coupled GPS approach into my local airport.
IMG_2079-2020-08-29-12-12.jpg

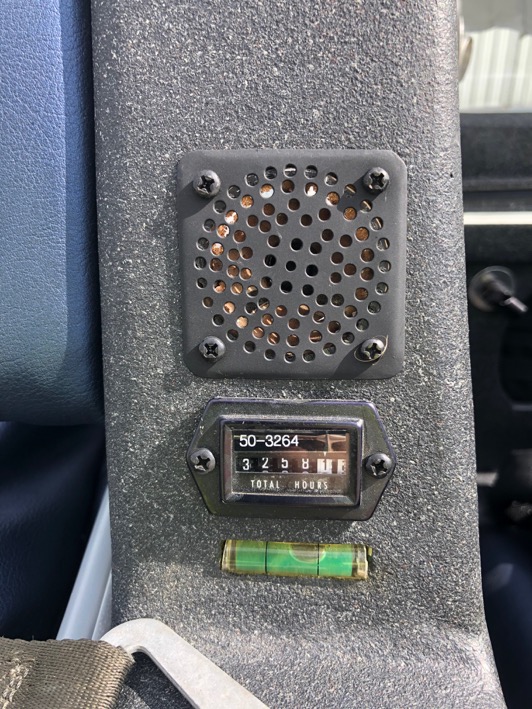
The head rest has the hour meter, speaker and a level to to be sure you you dont flip the plane when parking on a non-level surface and for accurate fueling indications.
IMG_2017-2020-08-29-12-12-1.jpg

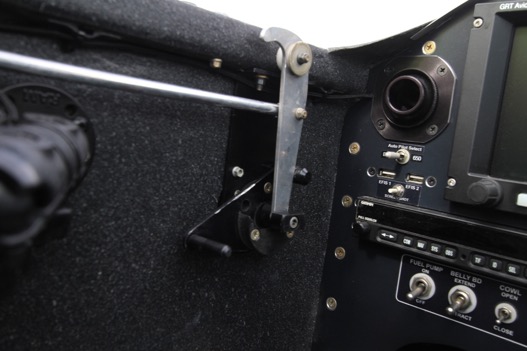
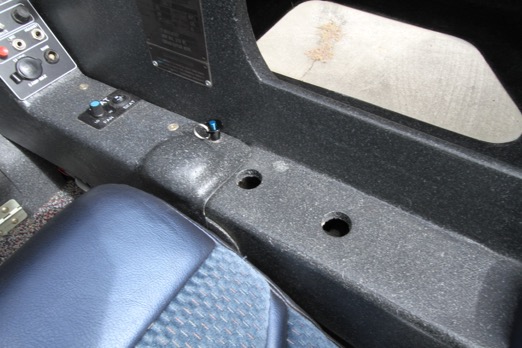
There is an additional cover the rear stick to prevent interference of the control system when packing out the back of the plane. You can also see rear strake windows.
IMG_69581-2020-08-29-12-12-1.jpg

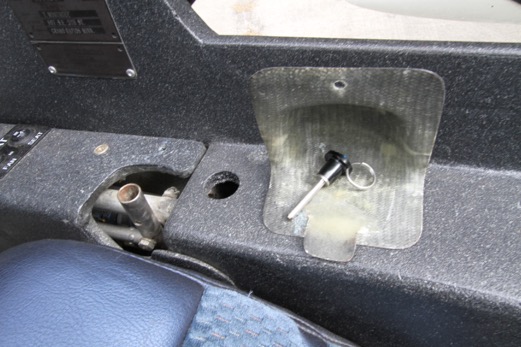
The stick cover is removable and the pin is used to secure the control stick when needed.

IMG_69591-2020-08-29-12-12-1.jpg

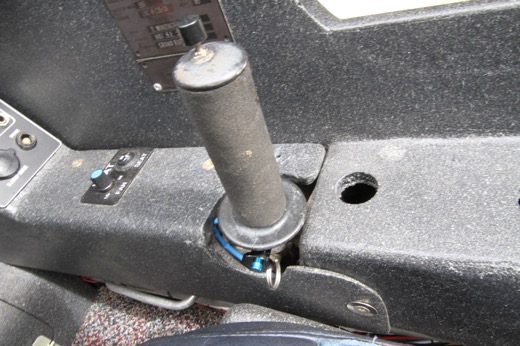
Stick installed and wired into the Comm PPT system.

IMG_69601-2020-08-29-12-12-1.jpg

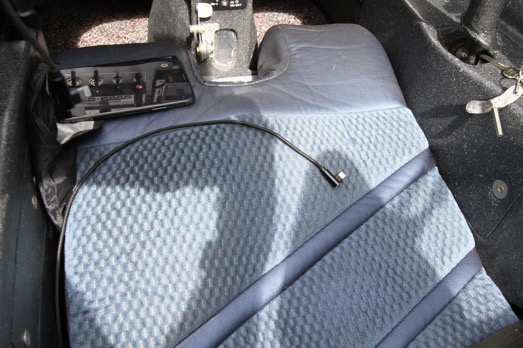
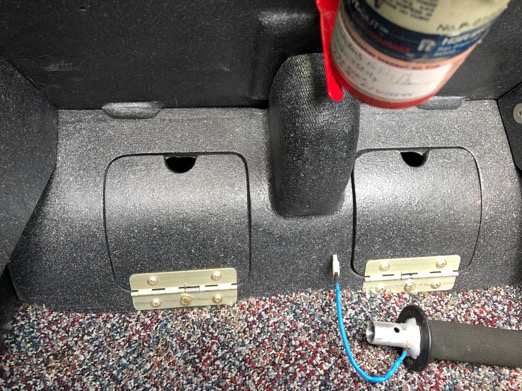
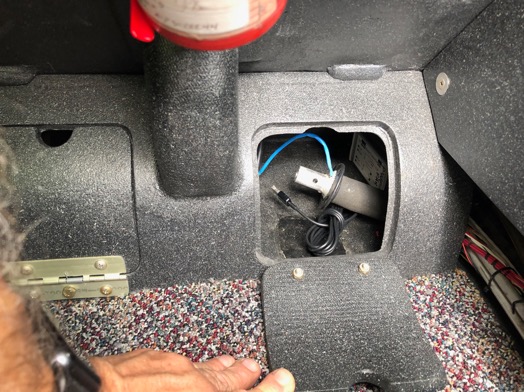
When not in use the control stick is stored in a foot rest compartment for the passenger. It utilizes the space effectively and is more comfortable for the passengers feet.
IMG_2024-2020-08-29-12-12-1.jpg

IMG_2025-2020-08-29-12-12-1.jpg

The passenger has side panel installed on the port and STBD sides to cover the control system. There another USB outlet on the port side panel. You can see the ball mount for the rear passenger to mount an IPAD or other device.
IMG_6961-2020-08-29-12-12-2.jpg

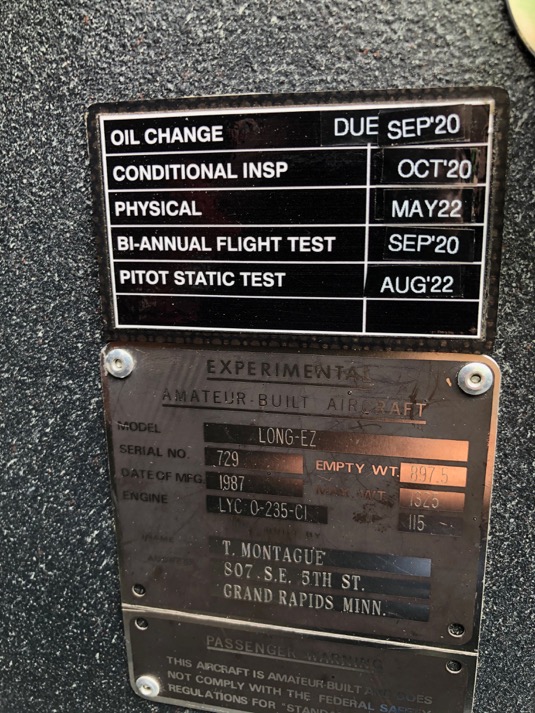
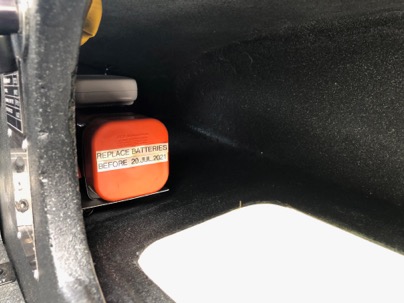
This is how I keep track of key dates I need to be reminded of.
IMG_2021-2020-08-29-12-12-1.jpg

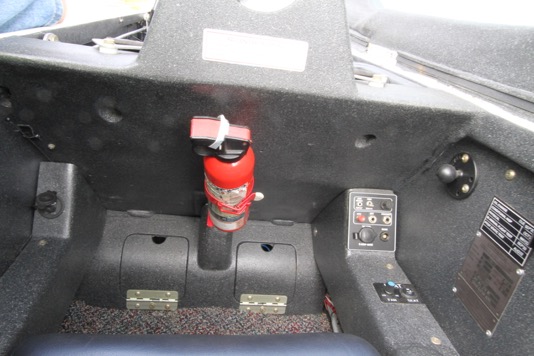
Passenger panel for music input, lighting control, headphones.
IMG_2019-2020-08-29-12-12-1.jpg

Rear heat control for the fan and seats.
IMG_2020-2020-08-29-12-12-1.jpg

ELT Battery replacement reminder.
IMG_2028-2020-08-29-12-12.jpg

The rear headrest covers the electronic bay.
IMG_6963-2020-08-29-12-12.jpg

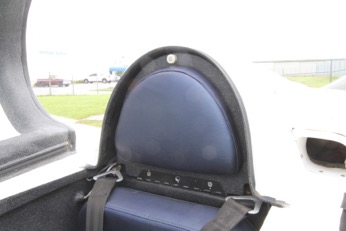
Behind the head rest cover is the Odyssey PL680 Battery, GRT 4000 engine monitor, starter solenoid, MAP sensor, fuses, Princeton fuel level capacitance modules.
IMG_2035-2020-08-29-12-12.jpg

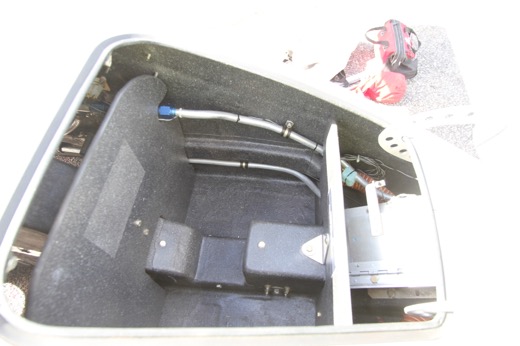
The spar box is also used for additional storage.
IMG_2036-2020-08-29-12-12-1.jpg

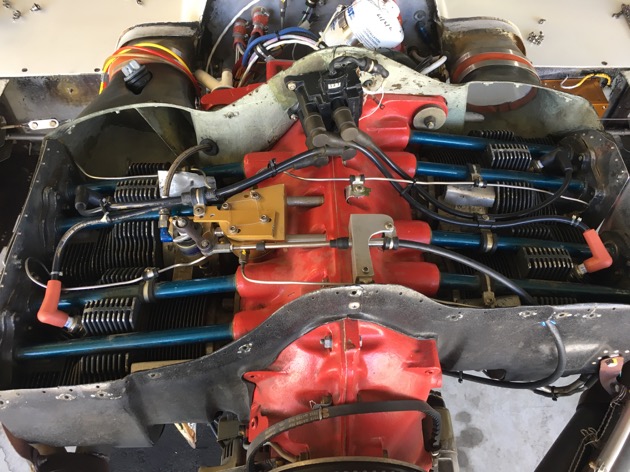
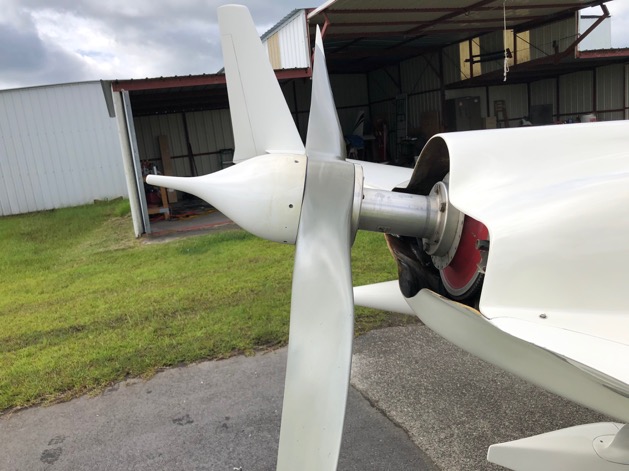
The business end… The prop is a Gary Hertzler Silver Bullet which has be dynamically balanced with the ACES balancer. I have a ring on the prop to allow for easy attachments of weights.
IMG_2041-2020-08-29-12-12.jpg

IMG_2044-2020-08-29-12-12.jpg

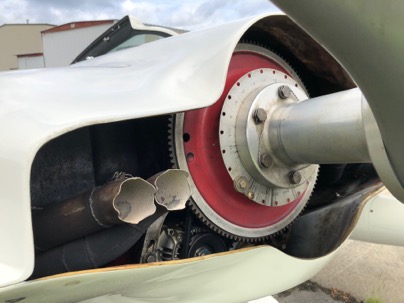
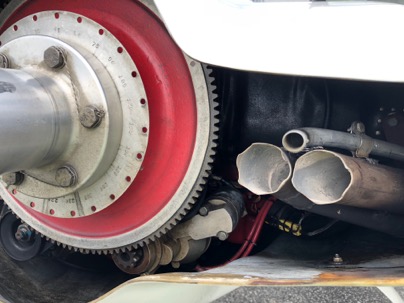
IO-320 with AirFlow Performance fuel injection. 9.1 compression pistons, port and polished cylinders. Dual PMags (114 series). Fuel flow (injectors) have been balanced to allow aggressive lean of peak operation.
Cylinder cool very well.

Additionally, there is a Reiff engine pre-heat system installed. Reiff Website It heats both the engine oil and the cylinders with the 50 watt band heaters. If you have electric in the hangar, you can preheat the engine on a timer so when you arrive at the hangar on the coldest winter day, the engine oil and cylinders are hot. You can go to full power immediately after startup.

With preheated oil, you’ll get cabin heat from the Ram Heat system as soon as you get in the air. I usually preheat the engine before a flight. When I arrive at the hangar the engine oil is already at 115f, cylinders are at 140f. After engine start, on taxi, I close the ram heat door, turn on the seat heaters to warm up, and turn on the oil pump. When the oil temp indicator at the heater starts to increase, I open up the ram heat door, and turn off the heater. It only takes 1 or 2 minutes. I love having cabin heat before i leave the pattern.

IMG_8907-2020-08-29-12-12-1.jpg

IMG_2043-2020-08-29-12-12-1.jpg

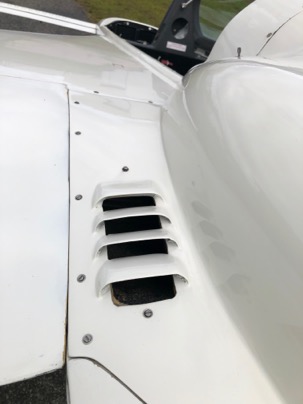
The cowl has cam lock fasteners and no screws. This is the oil cooler outlet. My oil runs a 175f all the time. I never see it any higher.
IMG_2042-2020-08-29-12-12.jpg

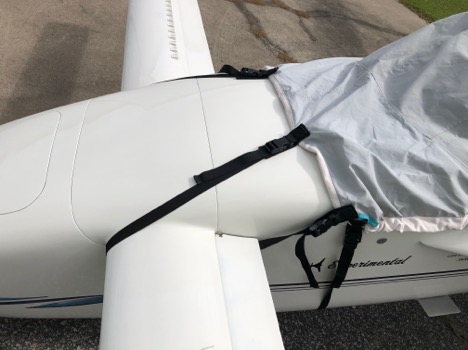
Bruces LongEZ travel cover.
IMG_2037-2020-08-29-12-12-1.jpg

I had Bruces modify it with additional straps (which are essential) to keep it pulled forward when you cinch up the back of the cover on the trail edge of the wings.
IMG_2039-2020-08-29-12-12-1.jpg

Performance

A screen shot at 13000 ft. TAS 162 kts @2460 rpm, OAT 40f, 6.2 gph. Cylinders running between 325-354f
IMG_13242-2020-08-29-12-12-1.jpg

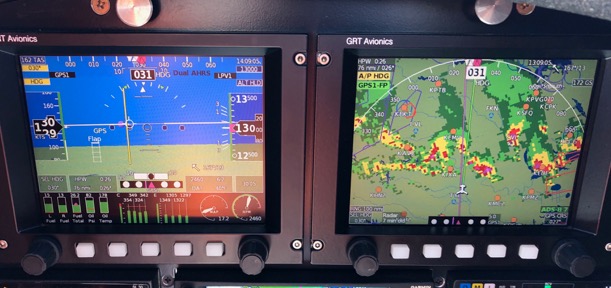
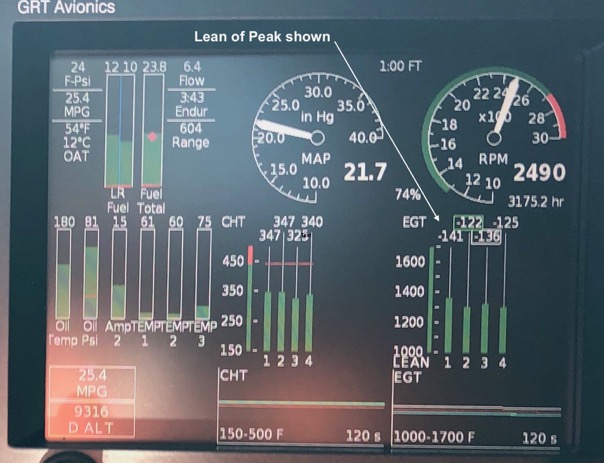
Lean of Peak Operation

8000 ft. TAS 165 kts @2490 rpm, OAT 54f, 6.4 gph, Cylinder 325-347f.
IMG_8409-2020-08-29-12-12-1.jpg

The is an enlargement of the Stbd EFIS panel above. You can see the engine is operating at an amazing 122-141 f Lean Of Peak operation while still cruising at 165 kts. This indicates exceptional well balanced fuel injector restrictors. Who needs GAMInjectors?
IMG_84092-2020-08-29-12-12.jpg

Cabin heat

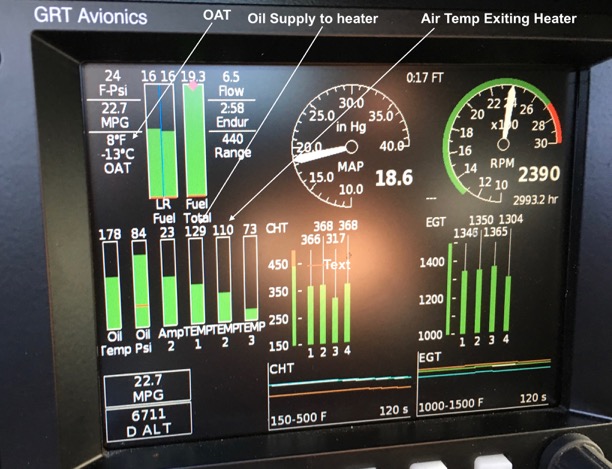
A shot of the heat system in operation while flying home from PA. OAT 8 deg F, Temp1 is the temperature of the oil supply (129f). Temp2 is the air temp of the air exiting the heater (110f). Temp3 is the temp of the rear seat area. This data indicates there is a 102f temp differential across the cooler (OAT@8f- Temp2@110f).

Obviously, I was very comfortable at 8f on this flight with no jacket, gloves or wearing no special cold weather gear. i was wearing a long sleeve shirt and jeans. The plane had zero air leaks around the canopy and no fogging of the canopy since the cabin is being flooded with hot dry air. This is the advantage of Ram Heat.
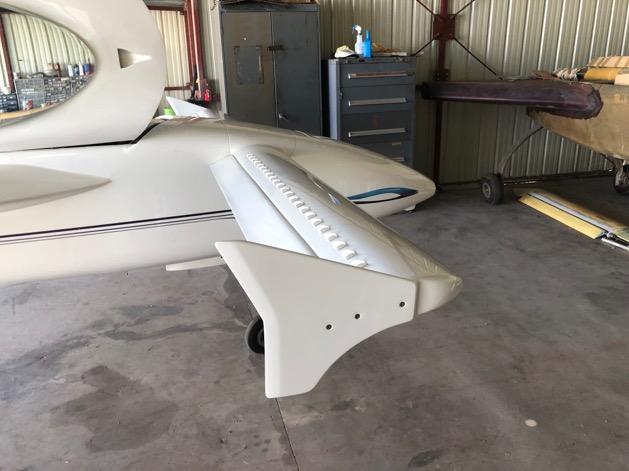
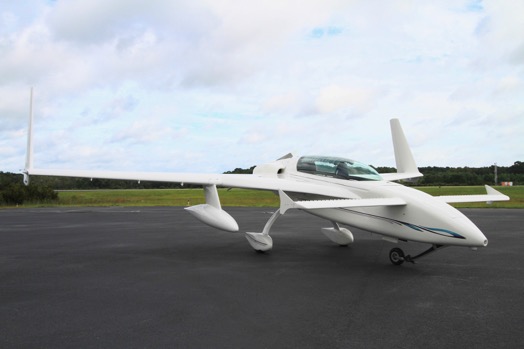
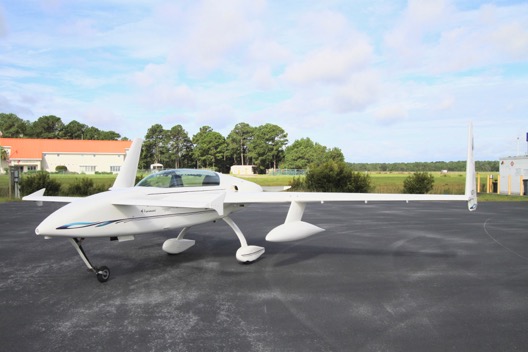
IMG_65922-2020-08-29-12-12.jpg

Canard Fences

Here you can see the canard fences I developed and tested. I have been using these on the plane for over 7 years and they really increase the plane’s ability to handle of cross wind landings with canard aircraft by essentially increasing the effectiveness of the rudders. Fences increase lift on the canard while also allowing the plane to easily take off in heavy cross winds without scalping. I am the only canard that I know of that has them installed and will have them on any canard that I own in the future..

I gave a presentation at the Rough River Fly-in which discusses the benefits of canard fences on how and why they work. adfgsdfgIMG_9609-2020-08-29-12-12-1.jpg

Nov 17 2015

Prepping the cabin for glassing

After removing my pressurized oil heat system, I decided I NEED to do some glass work. I am tired of stripping and sanding and taking the plane further and further down the path of disassembly. I need some creative time with the bird..

This is the normal canopy hatch door that I am closing off. See the red lines. It is a wire chase I am installing for an accessory mount for my iPod at the left end. I will wire power and a stereo input thought the case. I hate to see wires and this is an easy install.

Draw a slight line, drill a hole at each end, drill a hole in the door flange and auger out the foam in between.

wpid-IMG_3406-2015-11-17-18-04.jpg

After fitting a piece of foam to close the door, drill a hole though it along the level line, Split the foam along the drill hole, stick at soda straw as a conduit, micro in the bottom and top pieces of foam and glass the door. Took all of 10 minuets to prepare

wpid-IMG_3405-2015-11-17-18-04.jpg

This is the airbag for the engine (holds the air filter).

The Door on the box was a later addition which I used to increase the cabin pressure when flying though rain.

Opening the door would to raise my normal low -50 mph cabin pressures to +5 mph cabin pressure. All the water stopped entering the cabin. I could actually feel the vents in the plane reverse direction. It is low cabin pressure which sucks ion the rain and cold. Adding more seals is just trying to fix the symptoms of the problem, without addressing the root cause.

The only drawback to my original test design was it made the cabin incredibly loud due to power pulses from the induction system having a clear path into the cabin.

wpid-IMG_3409-2015-11-17-18-04.jpg

I have a new type cabin pressurization system I have designed will address two things. Pressurization of the cabin, and improving the climate control if the cabin. If this system is successful I will duplicate it in the cozy. I learned what I needed from this successful experiment so time to be removed.

wpid-IMG_3410-2015-11-17-18-04.jpg

The door addition was cut off and box will be returned to it’s original design. Weight removed. 8 oz.

wpid-IMG_3416-2015-11-17-18-04.jpg

An area was prepared for glassing. I will be the cover for where the floor where the of the ADS-b antenna and ground plane will be installed.

Apr 26 2010

Choop not doing so well…

Today was a relatively fun day, but somewhat short one.  I had a slow start due to a slight infection (I hope it is not from Chomp)…

I decided to move the BOTTOM VOR antenna connection from where I just installed it last week.    I thought it was not the optimal postion for easy access and thought there could be a better place for it.    I could have easily left it in that location, but since I was installing TOP #2 VOR connector on the front of the canard cover, why not move #1.    It only take a few moments to put in, and even less to take out.  Worked out great!  

Former location

New location:

Glassed in.   Now when you install the canard, the BNC’s are protected, easily visible and easy to connect.

The Trio Pro pitch control system is installed with all the hardware.   My installation instructions I published a few years ago for the community still work well.  I will have to make a few updates to take into account a changes on the rotary arm and servo tab length.   Wiring needed.

The closure of the hatch door is complete and sanded.  Ready for epoxy sealing.   Need to complete the installation of the canopy closure system (tomorrow or Wed).

The Grand Rapids Horizon HX EFIS electronic sensor module (dual AHRS).  This box contains he main instrumentation sensors for the glass panel.   Wiring and tubing needed.

I am taking Chomp to the doctors tomorrow.  I think he may have had too much alcohol to drink.  He just doenst seem to have much energy lately.

Nov 02 2009

Drip Rails part 3

Today was spent entirely spent working on the drip rails.  After sanding, the back one came out beautifully.  The front one has issues.    As it was being sanded and shaped, I wanted to see  if the instrument panel would still properly fit.

SHIT!  The funky shape of the canopy caused the seal area to dip way down which now interferes with the installation of the instrument panel.  I would have to trim and cut off the corners of the instrument panel which is totally unacceptable.   Doing so would work but it would ruin the look of the panel.   I had to step back, re-evaluate the whole thing and come up with a different game plan.  The drip rail needs to be installed no further than the pilot side of F-22 to achieve the right look.

A second seal was placed in micro, and the canopy closed.  Tomorrow, I’ll see how it looks and how hard it is to dig the seal out of the micro.   The thing I really like about fiber-glassing, is I could always cut everything out and start over again if necessary.   I hope that option is not necessary.   The strap around the plane holds the canopy tightly closed while the micro is curing.

Oct 29 2009

Drip Rails part 2

Today was a fun day.  It was exciting to see how the molding that was done on the drip rail turned out.  These are some pictures of the passenger rail.  After the foam was removed it was time to get into the plane and sand/trim.

The rough shape after glassing

Trimmed and fitted to the canopy cover.

The fit from the inside.

It came out perfect. 

So easy a cave man can do it!

I hated be cramped up into the plane sanding and trimming! 

This picture is of the front drip rail.  After glassing a trough onto the canopy a few days ago, the canopy was closed and a rough glassing of the rail was done to transfer support to the fuselage.  The glassing was a bit hard to do (upside down, little space).

When the canopy was opened, the channel for the seal is perfectly fitted and transferred to the plane.  Two more layers of glass will be used to ensure good attachment to the fuselage and finally, micro will be used to dress it out with a nicer finished product.    Overall, these seals will really reduce air leaks when flying and rain when parked.  Well worth three days efforts.

IMG_3737

Worked 6.3 hrs.

Bob stopped by to inspect the progress on the project.    Had to kick him out after a while because I was on the clock and had some glassing to do before I could quit for the night….    I sure enjoy his visits and support…

IMG_3732

Oct 27 2009

Front Seat Vent

Work was stared on the drip rails.  Normal when someone builds these planes these rails are constructed early in the process.  The also allows for the installation of a weather seal which prevents rain from coming in the plane when parked or when flying.   I personally think they are critical as I have had rain puddled in the back seat, wet cushions, radio issues all from water coming in the plane before they were installed in my plane.    Unfortunately pPod does not have them  and fortunately, I have put them in my plane.

This first pictures show the installation of a 1/8″ thick foam channel which will allow the molding of a small channel for the weather seal.  This rail will require two lay ups.  The first is to mold the channel, the second is when the canopy is reinstalled and it is glassed to the forward part of the plane.

Work was completed on the installation of a front seat vent which is supplied by the 3″ NACA  inlet. 

A butter fly valve was also installed to increase airflow into the cabin.  It is actuated by a lever which goes through to the front seat for the pilot to open.