I decided to take a few pictures of the current work as I am going to take a couple of days away from the work to get a some chores done. Sort of a working vacation.
Here is the shape of the outlet duct I came up with. It is a much smaller outlet than original and compresses the air prior to injection in the airstream. I wanted a slight kick out to create a low pressure area just in front of the outlet (somewhat like my plane which I know works well. When I start flying the bird, I’ll record some data reading to see just how well it compares to my plane.
the oil cooler was tilted 25 deg from orginal. Te final effort is creating the inlet duct. Some sanding and it is ready for paint!
I made the decision to organized all my electrical stuff. It is much more efficient to have everything inventoried, organized and easily assessible to speed up electrical work. I was getting frustrated looking for stuff asit was slowing my progress down.
A table full of … stuff…. Now I have to sort through all this stuff and get it organized. This will take HOURS (but time well spent ).
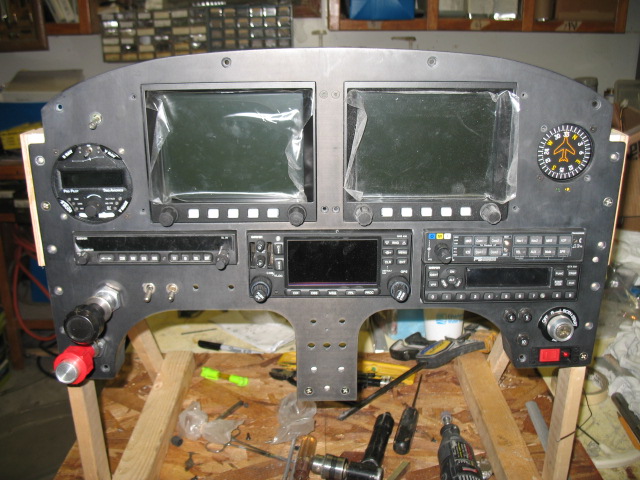
I also wanted to populate the instrument panel to see how it would look and it is freaking beautiful. This picture doesn’t even begin to do it justice. It it going to look fabulous when installed in the plane!
Today was a great day. I drove up to Summerville this morning to look at a 1995 Mercedes diesel. It turned out to be a bust… I then flew over to Mt Pleasant to meet up with Mike to fly together.
He has a beautify acrobatic plane a IO-360 (180 hp) christian eagle. Mike is taking his wife up for her fist flight.
I bet she was happy when he did a quick barrow roll!
This is a great shot over Charleston with the new bridge in the background. The crazy thing he kept asking me to slow down. Mike had his plane firewalled at 130 kts, so we slowed down to 125 kts (2700 rpm) and I was only turning 1900 rpm. When I left him, I firewalled my plane and quickly pulled away from him. I never felt so fast!
While I was landing, I noticed the lock gear down light was not lite and I could not cycle the gear down properly (about 1/8 turn from full down). This seemed strange to me and I felt the over-center device hadn’t engaged so I called the tower to let them know I had a gear warning light. Sure enough when I touched down, the nose started to collapse. Sort of progressively dropping instead of a quick drop, BANG. I was almost stopped with I hit the ground. The plane was moved off the runway, I lowered the gear (this time it locked) and taxied back to the hangar.
Minutes later the towered called me. Within 30 minutes the S.C Flight Standards Office called for an update. If only the rest of the federal government worked as well as the FAA.
I told the FAA there was no problems, the plane wasn’t damaged, (it wasn’t) and everything was ok (it was) then immediately started tearing into the nose to find what what going on. I was lucky this time, I only ground about 1/4″ off the nose bumper!
I removed the nose gear assembly and found the gear had stripped. It was tuned 180 degrees (just flipped over) and it was as good as new. Reassembled the plane, test all and decided it was an anomaly and watch for any warning signs in the future. Another new experience to learn from.
One good thing about this event is that I now think I can install a electric nose lift in the plane. I always thought there was not enough clearence in this area, but after disassembling everything, I now believe it can be done.
After fixing the plane, I stopped by to see a bunch of my retired navy officer friends at the yearly RINK roast at the Elks Club. It was great seeing some of my old buddy’s.
Drove up to Summerville to get some waste oil for my car and Gerhart and I and a bunch of problems with the filter system
We had one bag rupture in the filter housing. I guess it just got too plugged up and the pressure got to it. After we finally got it out (in the blue tub), we installed a fresh filter and it came unhooked and plugged the system up. Lessons learned…. put a pressure gauge on the discharge of the pump (to monitor the health of the bag) and install the new bags differently than what I did this time.
In both cases, it is easily fixed.
I FINALLY talked Gerhart into letting me install a proper piping system similar to the one I have in my shop for his tanks and filter. It drives me crazy to have such a mess of hoses and loose pumps that trying to make things work when it can be properly engineered so easily. On Saturday, I’ll make up the manifolds and install everything next week.
I also flew from Charleston to Mt Pleasant to visit Jack Wilhelmson to help him install my fuel probes in the new cozy 4 he is building. Although it is only about 40 min by car, I can fly there in 7 minutes from the hangar (plus 10 minutes to the house). 17 minue trip time is great plus I got to fly today!
The fuel probes went in very easily with no problems. It only took about 10 minutes /probe. It is SOOOooo much easier to install them on a new build than on an existing plane which (which is fairly easy to do anyway).
No work done on my plane today…. bummer. Tomorrow I’ll really hit it again on the wiring.
UHOOOOO… Quick update
UPS delivered the instrument panel tonight.
After months of false starts and many tries I am positive this panel has turned out to be the labor intensive and totally frustrating EZ instrument panels ever made. I must have spent at least 40 hr just lettering it, after which it was sent to CA for clear coating. Everything was sanded off. It was then sent to a avionics shop in Chino, Ca for printing. They had it for months and it ended being sent back to me completely untouched.
I then spent numerous hours custom fitting (back setting) the radios for a differnt type of look and fitting it to the plane (to make dam sure it would fit as expected this time) before being sent to Aerotronics in Billings MT for lettering.
Aerotronics did a great job and it looks FANTASTIC!! I cant wait to see it populated with instruments in the plane.
The panel had the last fitting today. Found some issues I still needed to correct but I think it is just about done! Yeah! Although the panel easily is removed from the plane with the radio cans in place with no wires, I’ll need to write a procedure up on exactly how to remove all the interferences prior to actually taking it out. There sure would be a number of steps….
It is quite impressive with everything in place. The Trio Autopilot head was sent back to Trio because the display was not working. I also wanted to get it upgraded to the latest firmware (which includes support for Grand Rapids GPSS and GPSV.
Also completed to day was the baffling mods for the engine. As soon as the instument panel is set off for lettering, I’ll be able to complete the engine work.
Today was dedicated to getting the panel finished so I can send it out for lettering. It has the longest lead time to get back to me. The radio cans were positioned and the nuts were bonded to the side boxes to hold everything in alignment after disassemble.
Next was milling the backside of the .200″ thick carbon panel down to .125″ thick in for some of the switches. Some areas were milled to .060″ for LED lights.
Two “Data Ports” were machined into the panel. These ports will allow the pilot to upload flight plans, software, maps, etc to the Grand Rapids Flight system, as well as down load recorded flight data (air and engine) to be analyzed after landing.
The switch at the bottom of the panel is actual an air valve which will allow the pilot to have an “alternate static” port in case the fuselage port gets plugged. I think I may look for some different knobs. I don’t like the size of these all that much. I think they are a somewhat big.
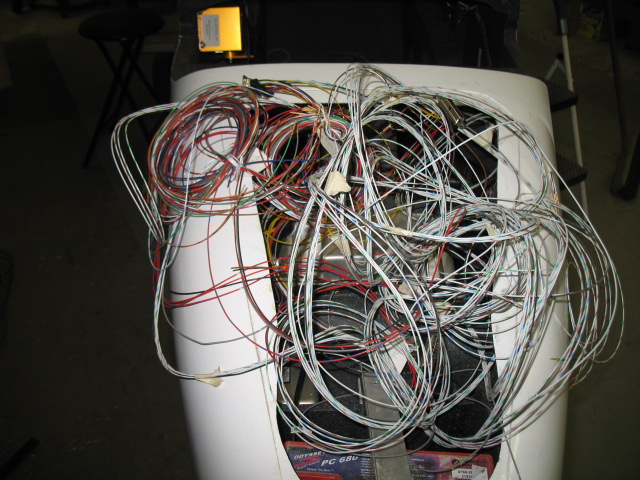
I started laying out the wiring for the GTR system. All these wires are in addition to the ones in the back of the plane which are for the engine monitor. This doesn’t come close to what needs to go into the plane. When I was a kid I used to think it was fun to unravel a mess of tangled string. This wiring rats nest makes me think of those days long ago…..
Finished installing the cans for the radios today and wanted to see how the panel looked together (for the most part). Found a minor lettering issue I’ll need to resolve before it is sent off. This is certainly the most advanced LongEZ panel in the world. I have never seen an EZ or Berkut with this much electronics. It is going to be a blast to learn to fly this bird with all the computers on board….
Wow, I sure have a lot of conectors to hook up to wire the panel….. should be fun!
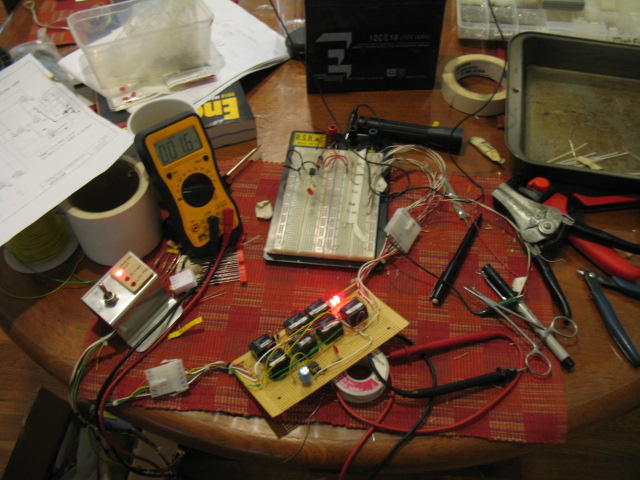
I finished up the work on the WVO car controller. I built a test stand to simulate all the connections and switches of the car and dang it, the thing worked as I originally designed it. I dont know why I thought it was a bad design. After a few hours work on the timer circuit it now works perfectly.
Basically, in AUTO, the WVO system now waits for the coolant water to get up to 60C, turns on the oil supply valves, turns on an electric oil heater to keep the oil a minimum of 50C (it cycles as necessary).
If the fuel in the supply tank gets to 1 gal, it shuts everything down.
When the car is turned off in AUTO the system closes the oil valves and keeps the engine running for 30 sec to purge out the WVO before it turns the car off. Very cool… The next step is to install LED’s and the switch in the dash with some nice lettering to make it look good. It is amazing to me that a commercial unit which does the same thing this does cost $350. Mine cost about $25.
The engine is now on the plane. It really looks good now with the newly painted engine mount and engine.
The is a close up of the firewall penetrations. After all the wires are run, I will clamp the firestop tubing around the wires.
The insturment panel came back to me unletter but with some nice glass work done around the leg openings and radios. I spent all day fitting the radios to the panel so they would have exactly 1/4″ exposure from the panel.
Tommorow, I’ll finish screwing the radio boxes to the panel and some other detail work which needs to be done prior to sending it off to be lettered.
Today I put in some long hours and got a lot of things done.
While sanding the engine mount to prep it for painting, I found an vent hole which had never been closed off because a support rod was in the way. I just drilled a second hole, welded it closed, filled the tube full of linseed oil and closed it off.
Since I had the engine mount off, I took the opportunity to close off any unnecessary hole in the fire wall. This was a big one the original owner had cut to allow for a DB-25 plug for the ignition system.
I tired welding, but the metal is so thin I just couldnt get a stable arc, the fiberfax just vaporizes and blows holes in the weld. Hum…what to do??
I decided to install cover plates over the holes with SS rivets. It worked out much better.
this plate closes off some holes used for the ignition system high tension leads.
There was a couple of big ones just below the cable pulley. Closed off too.
I finished painting the engine mount. Hopefully I’ll install it tomorrow if the paint is hard enough.
This is a one of four firewall bushing I machined out of a high temp fiberglass rod. I am using these bushing to for all wires going through the firewall to prevent any contact (shorting) of the wires. They are made long on the engine side so I can put a firestop sleeve over the exposed bushing and clamp it to the wires.
Most of today was spent researching, planning and ordering materials for the “blended winglet” modification I want to do on the wings. What is it? The blended winglet design was first introduced to the canard community by Jack Morrision on his E-Racer about 3 yrs ago. A beautiful plane which was later destroyed in a fire. Jack is working on a new plane which looks just as incredible! His a very innovative guy!
The blended winglet is the latest “craze” in the canard community. Once you see on on a plane, you’ll know why and will have to have on.
The interesting thing I found out from the ordering/research, is that if you were building new wings from scratch the blended winglet would only add about $50 or so to the cost of each new wing. It makes the wings look much sleeker, reduces drag, and provides a real and permanent speed improvement.
In a retrofit situation, the rebuild will cost around $250 or so (less epoxy) per wing. As I proceed into this phase of the project, I’ll refine the numbers for a more accurate cost of the mod.
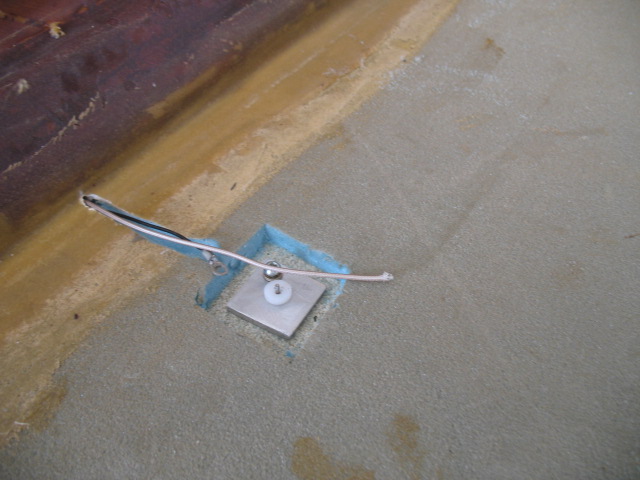
I spent some time working on the fire suppression system. Had to scratch my head a few time on exactly how it was to be done. As usual, I give myself a seemingly impossible challenges for which in the most part can eventually be worked out. After an hour or so of fitting, I was able to solve the problems such as routing of the discharge line, activation cable, mounting, having access to the spar wing bolts, viewing the tank level, etc. The bottle will limit the storage capacity of the spar area, but if I need more baggage space for a trip, I can put on some of beautiful carbon graphite baggage pods P1 Cmposites is now building.
The cable is routed through a soda straw to allow it to be removed. I need to go the movies shortly as I find they have the best straws for glass work. I usually grab 3 or 4 at a time. The straws are really long and have a large diameter t0 guzzle down those super sized drinks you have to mortgage the house to buy (along with the popcorn).
After the plane work I tested out the next phase of my grease car project. The filter system I made out of some bag type filters I purchased at Duda Diesel. Buying this kind of filter (bag type) is much cheaper than buying cartridge type filters. For this test I have a 1 micron filter (size of bacteria) which is smaller than the 10 micron filter in the car. Worked great!
I am finding I hate the filter and pump stuff in the shop. The next step is to buy 2 plastic 50 gal drums ($20 ea) and install a underground pipe line from the front driveway to the back shed (the pipe is free) and move all the filter/storage crap to my shed. I’ll have to disassemble my cart, but I can reuse all the hardware.
Then I’ll just pump the dirty oil from the drum in the truck (via the pipeline) to the shed , filter it, store it, then pump the clean oil back to my driveway (via the same pipeline) and into the car. Clean, neat and out of sight when not needed. Sweet.
This afternoon while emailing DURING A THUNDERSTORM, my computer crashed…. Big time crashed. I know, you have always been told turn off all your electrical stuff during a storm. I THOUGHT I was protected with a UPS and an isolated system, but no, a big crack of lightening, computer crashed and next thing I know there was the “Hard disk not found” during boot up. Yikes!
As recommended I had made a “Recovery Disk” (imagine that) when I installed the operating system and as annoying as the daily backup is (slowing down the computer) for some reason, I had let it run to completion this morning. I booted up on the recovery disk, had to do a complete re-image of the computer “C” hard drive (from this morning’s back up) and wala! the computer is working perfectly again. I keep all my data on the “D” drive (a second drive) so I didnt lose a single file. Windows 7 is terrific in my book! Now I just need to turn off my computer during the next storm.
I had the fuel caps engraved. Actually they look very cool. I’ll paint the lettering a suitable color when the plane is painted the plane in Calif. Polished up and lettered I am sure they will look great!
Disassembly of the plane to prepare it for painting continued today. I have a huge pile of parts now. I want to weigh everything added to the plane (such as the heating system) to see how much my work affected the weight of the plane.
The HID landing light installation gave me a bit of trouble. At first, I didnt think it could be installed. The HID bulb is much taller and a little larger in diameter by 0.015″. Doesn’t seem like much but the bulb would not sit flush to the bracket .
Careful, extensive filing and bending of the aft brace bracket was required to get it installed. The HID light is incredibly bright and requires much less power than the standard 150 watt ligth that was installed.
Installation of the Halon fire suppression system was stared. If a fire is sensed in the engine compartment (there will be an alarm on the EFIS), the pilot can pull a handle on the dash which will flood the engine compartment with halon and quickly put out any potential fire.


