Apr
30
2011
After the splash was made of the leading edge of the wings, a flange needed to be made to support the lens. I used 4 layers of bid.

After wetting out the BID, it was placed in the wing splashes to set up.

Here you can see the splashes (left) the flange parts (right) lights and the 3 way supports for the lights to allow them to be aimed (adjusted).

Apr
29
2011
Today, Tony and I moved the wings from the airport to the house for mods… I am going to put an antenna in the stbd wing and wing lights in to the wings.

The antenna location.

the surface was ground down though the micro, the antenna installed (checked with a SWR meter), one layer of glass to cover it and micro’d.

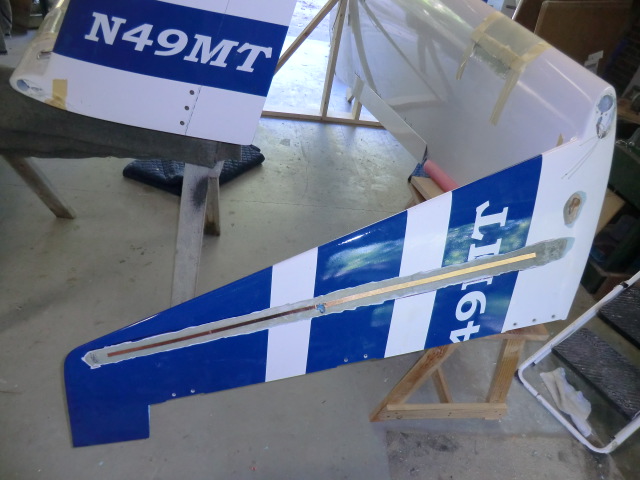
A splash was made of the wing leading edge in the location of the wing lights. I needed to do this to mold the Plexiglas lens.

Apr
28
2011
After a close inspection of the prop, I found delamination of the carbon exterior near the hub. I have had this happen on my Hertzler prop. I am not sure if it is a result of heat or the compression of the wood at the hub.

To repair, I injected west epoxy into the delamination, heated it and used a vacuum pump to compress the surface to reattach the glass to the wood.

after a few hours of curing, it looked great!

After repairing the prop, I was able to get the engine running. It started immediately! Click on this link to view the video. First Engine Run!
Apr
27
2011
I decided to try a second type of earth bucket. The first type of earth bucket was a pain to make. I felt if I just used gravel (river stone) as a storage medium would make the earth buckets much easier to fabricate, although it would not store as much water.

I tested river stone (small stone) or the larger decorative stone. Much to my surprise the decorative stone held a little more water. A little over 3/4 of a gal. Yah! The river stone can be purchased for about $3.50 per bag and the two bags will make 3 earth buckets.

To make the bucket, a center tube (3″ pvc) is cut about 8″ long. I put tape across the top to prevent the rock from filling the “wick” tube. I then filled the bucket with gravel to about 1″ below the wick. Drill some holes in the side of the bucket at the top of the gravel layer to allow excess water to drain out.
I found it easiest to install the fill tube after filling with gravel . After inserting the fill tube, I covered the gravel with some weed barrier cloth, cut open the center tube to allow the dirt to fill the wick tube and filled the bucket with water. I am not sure if you really need to cover the gravel or if you can just put soil directly on the rock. I am sure the soil would not migrate into the rock area very far. Put in your plant, and fill the storage area with water and you are done.

The plane is looking good! Soon I’ll be flying her.

Apr
26
2011
Bob stopped by to check out my work….

The cowl bump out is done. Ready to flox on and micro.

Apr
25
2011
The cooler is test fit. Looks good.


Apr
24
2011
The glassing of the cooler is done. Now it is time to paint it.


Apr
23
2011
Today was full of awwww shits…. now that the wiring is done, it is time to go back to working on the engine. I need mod the oil cooler ducts and get some oil/fuel hose made up. Shortly after starting some unforeseen miss matches showed up.
With the top cowl on I dont have enough clearance on the oil dipstick! Shit the door wont close…

I ended up cutting the dip stick down to shorten it 3/4″
I also found the cowl hits on the front of #4 cylinder….shit. I didnt want to cut up the baffling (dont have the time) or remake the #4 cylinder box, so I just bumped put the cowl. Did want to do it but I had no choice.

After cutting the cowl out, I made a foam shape and glassed it in.

I also needed to make a new duct for the oil cooler since I changed the intlet and outlets. This is the shape of the old duct.

You can see how the tubes no longer match up.


I felt it necessary to come up with a inlet tube which uses NO SCAT tubing, and still allows the easy removal of the lower cowl.

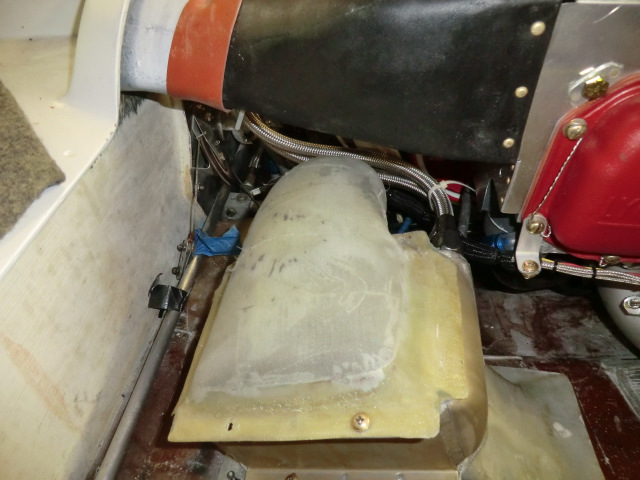
The cooler was encapsulated in foam and then carved it to the right shape. It is then covered in duct tape (black and red) to get ready for the glassing. This is the part of fiberglass work I really enjoy because it is very artistic.

Better get to glassing!
Apr
21
2011
This lever is for the fuel purge valve which during a “hot start” is opened to allow cool fuel into the the fuel injection system to replace hot fuel. It will also kill the engine if engaged since the fuel is drained from the system. I built a lock to prevent the pilot from inadvertently activating the fuel dump. I would hate to be flying along and kill the engine at the wrong time.

While looking at the instrument cover (which I had taken great care to get the carbon fiber to line up ..just right..) I decided it just didnt look right so it was painted a flat black to match the dash. It looks MUCH better now.

The wiring is all tidied up and ready to go!

The dash is starting really come together now.

Apr
18
2011
David stopped by to check out my work, have a beer and get a small circuit repair (broken LED). It was a nice distraction to my busy days.
\


