I am finally ready to get started. For the last few weeks I have been working on the panel design and wiring schematics.
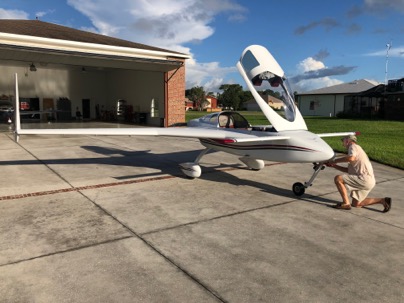
It is time move the plane home. It took a few hours to prepare for wing removal and transportation. Tomorrow Rodger will be stopping by with his trailer to move it to my workshop. Yay!
.
Fuselage | Nick | Comments Off on Disassembly of the Cozy 4
Back in August I purchased a beautiful Cozy 4 from Ed Richards in Tampa. I have know Ed for years, have flown in his plane and have always been impressed with his attention to detail building this bird.
The plane had all the physical modifications I was interested in, so I decided to buy it instead of completing the Cozy 3 I was working on.
I know it would take me many years to complete the cozy3 and quite frankly, I am tired of building. It was sold to Spencer in October 2019.
As much as I am impressed with the Cozy4, the one area I am very particular about is wiring and wiring documentation which incidentally is one area I am very passionate about. Wiring is the KEY to a good flying trouble free plane. After getting further into the ownership of Ed’s plane, I decided I needed to upgrade the wiring and while at it upgrade the panel to fully understand and be able to repair the electrical system and to improve the flight experience.
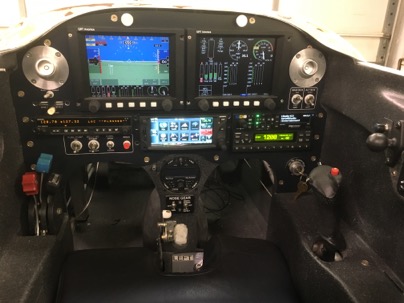
I enjoy using the Grand Rapids Technology system in my LongEZ,
My current LongEZ, GRT installation.
BUT, the technology is dated and this equipment is a major PITA to install. It is very typical of most avionics wiring.
For the Cozy I decided to go to the what I consider a higher level of design and simplicity and install a Dynon avionics package in the plane which will simplify the installation, reduce the wiring requirement, give me better customer support, and provide improved functionality over the GRT system.
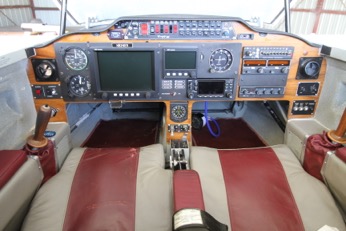
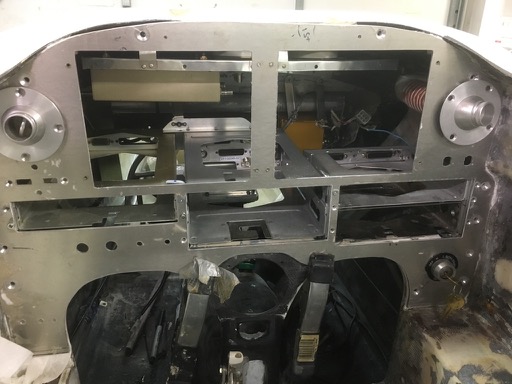
This is the current panel installed in the cozy. Its a mix of older (some very old), equipment which while completely functional and state of the art 20 years ago, is not up to what I want in a plane at this point in time where the technology has vastly improved over the years.
This is the panel I intend to create for the Cozy, It looks simpler and will have vastly improved functionality over the original equipment in the plane.
Beyond the wiring I will be installing a fire suppression system, fuel injection, a new heat system, and a host of other things.
This will be my LAST plane project. After completing this upgrade I am done working on any more planes. Period.
I’ll be heavily documenting all the work that is done on this plane. Mainly the documentation will help me remember what the hell I have done and help others who follow building their planes. I hope it will be of help to the reader.
Fun Stuff | Nick | Comments Off on The Journey has begun
Personally, I never really liked any kale salad until tried this recipe at thanksgiving. I asked the cook for the basics of what was in it and came up with my own variation. It is simple and easy to make. A mix of kale, nuts and cheese with a sweet sugar free vinegar/oil dressing. Hope you like it.
Sweet Nutty Kale by Nick
This is truly a “put as much as you want” anything goes types of recipes. Add whatever in any amount. The exception is the oil/vinegar ratio in the dressing which is fixed in the chemistry of cooking. Its always a ration of 1:3. 1 part vinegar and 3 parts oil. Boom…
Kale Mix
1/2 Bag (16 oz) of chopped kale from the store Recommend chopping the kale up some as there may be some big pieces in it.
..starting amount.. 1/4 cup of sunflower seeds
..starting amount.. 1/4 cup of pumpkin seed
..starting amount.. 1/8 cup of slivered almonds
..starting amount.. 1/3 cup Cranraisins (chopped)
..starting amount.. 1/4 cup Feta Cheese
Dressing… (basically just a balsamic type dressing)
In a mixing jar add the following….
– 3/4 Cup olive oil
– Dash of dijon mustard if you have any for a bit of tartness (it also helps bring the oil/vinegar together)
– 1/4 cup of vinegar. A mix of balsamic / apple cider / rice vinegar (my favorite) to taste.
***My mix is mostly balsamic and a little rice vinegar. Each one of these vinegars add a different character to the dressing.
–Add to taste:
-Sugar free maple syrup.. whatever amount tickles your sweet tooth.
-Salt, pepper, garlic powder, or whatever spices you like
Shake the dressing jar vigorously and put as much as you want on the kale mix (start with 1/2 cup). Toss the salad and put in the refrigerator for a few hours to let the favors blend.
The leftover dressing does not need to be refrigerated and is perfect for your next salad.
Fun Stuff | Nick | Comments Off on Sweet Nutty Kale Salad
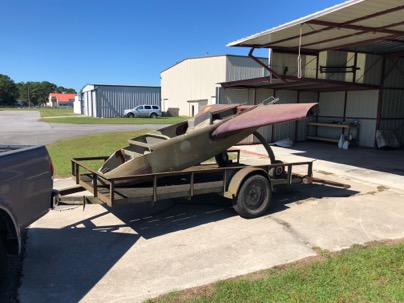
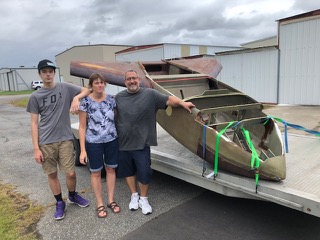
I brought my Cozy project home from the airport and now it is time for me to finish it. member what the heck I did in case someone asks in the future.
The plane has the following completed. The canard, the wings, the main fuselage. I’ll need to build a new nose, the turtle back, engine cowls and complete the installation of all the systems (heat, controls, wiring, engine, etc).
Overall, I am somewhat excited about getting started. The work provides me with a singular focus to my work days and keeps me engaged with the latest technology. I really like having big project to complete and this is a hell of a big one which will consume years of effort. Yikes, what have I gotten myself into?
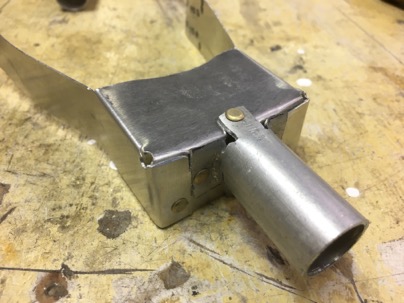
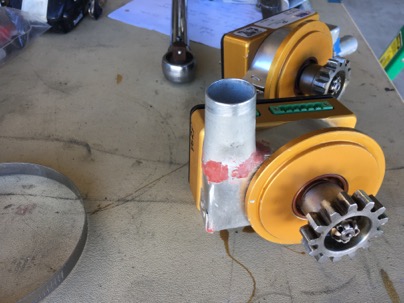
A requirement for a PMag installation is the addition of a blast tube on the base to assist in keeping the unit cool. Since PMag does not sell an adapter, it forced me grab some scissors and create a template. It took little time and is very light weight.
Here is two orientations I needed for both of my PMag.
Here is a very easy design to cut and bend the adaptor which insures the air is directed into the cooling grill on the bottom side of the unit.
After bending the metal (.015” AL) a tube was riveted on and all was sealed with a bit of RTV.
Here is an update for the angular slot transponder antenna.
My second test was conducted at 1200 ft, 18 miles from Charleston International. At this distance and altitude ATC had no problem receiving my transponder squawk.
Finally, I today I returned from a 1.5 hr cross country trip at 7,000 ft with the goal again testing the plane on a real trip. Again, no issues or complaints from ATC. At one point I was 55 miles from the receiver again with no issue noted from ATC.
Although my current installation location ideal due to the fact it is in a small cardboard enclosure and just one foot in front of the existing ground plane which covers almost the entire bottom of the cabin it still seems to work perfectly. If anything, this would be a worst case installation, but it works.
I know this antenna will be the one I install in my next plane.
Next Up, I’ll connect a test antenna for ADS-B in the hell hole (again, the few places in the plane free of ground plane paint).
LongEZ Upgrade | Nick | Comments Off on Transponder Antenna Test Complete
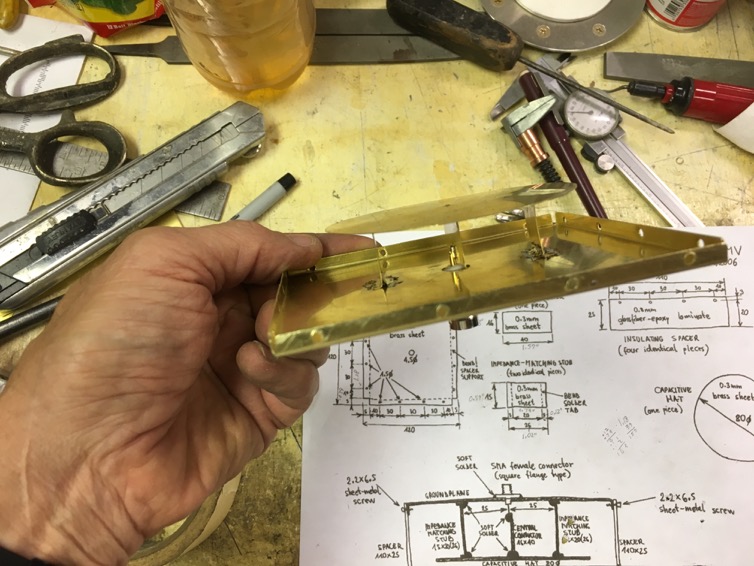
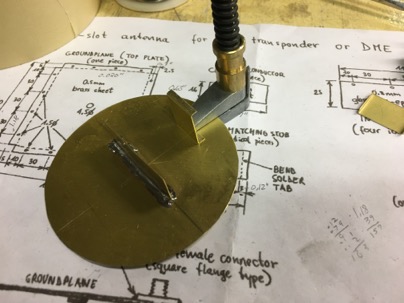
Yesterday I tried out a remarkable transponder/DME/ADS-b antenna I made. It is called an annular slot antenna. Very easy to build out of brass sheet stock. I never heard of this type of antenna. Apparently they are used extensively and most military aircraft use this type of antenna because they are no drag and totally flush on the surface.
Jack Wilhelmson told me about this antenna (he made one, but not tested) and gave me the drawings/materials, so I thought I would try making one for the plane.
Here is the fabrication drawing. Units are in MM, and be aware of the funny looking (European) “1” they look like a upside down V. If you look at the date of the drawing, you’ll see what I mean.
The write of of the antenna…
It was easy to solder it all together, and I had an extra BNC panel connector for the cable. It took about an hour to fabricate.
It is so simple to make I wondered if it would work at all given that it does not have a large ground plane, and is very weird looking.
TESTING:
To test the antenna, I temporarily ran a jumper cable from my existing transponder antenna location to the new antenna and went flying. At 3000 ft, I flew outbound from KCHS. At 25 miles, the transponder reply to ATC became intermittent. I was told by ATC that is about normal for most airplanes at that altitude which was very good initial test result in my mind. As soon as I banked around to return to the airport they immediately picked me back up again. So possibly, the signal was being shielded by the engine and the extensive ground planes installed in the aircraft.
I plan to leave the antenna connected in the plane for a while so I can test it on a real cross country flight to see if it performs as well as my existing external antenna. If it does, then I will definitely be using this design for my transponder/ads-b antennas in my future airplane. I would use it on my plane, but the entire bottom of the fuselage is painted with ground RF paint so I have to stick with my existing antennas.
This design will save a bunch of money, and I don’t have to worry about installing large ground planes for external antennas. Low drag transponder antennas are $80-$160 for a shark fin type. This one is no drag. One could hollow out the fuselage foam in the put a layer of glass to seal the foam and flush mount them on the interior of the plane and you would have no antenna exposer at all on the exterior.
Best of all you can build 2 of these antennas (for transponder and ADS-B) for about $25 with brass you can buy on amazon or a local hardware store. I am amazed I never heard of the design.
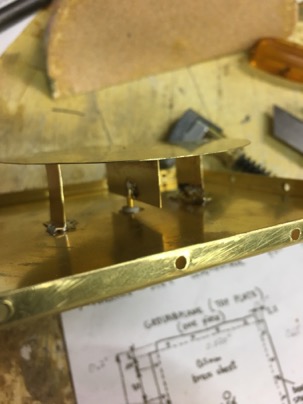
Here are some pictures of the build.
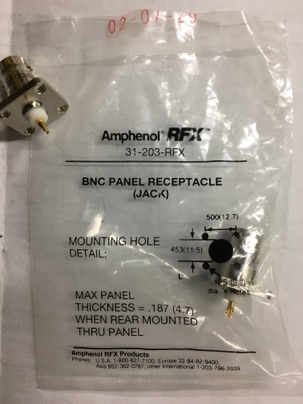
A BNC panel receptacle number 31-203-RFX about $4.00 Obtained at a local electronics store.
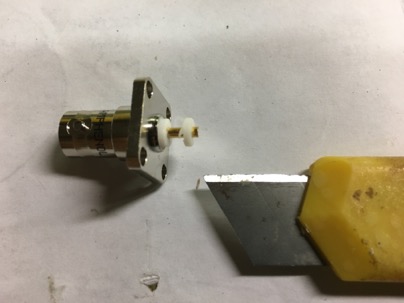
Trim off a bit of the unneeded insulator to help with the fabrication:
You could screw or rivet to hold the connector to the ground plane, I just soldered it.
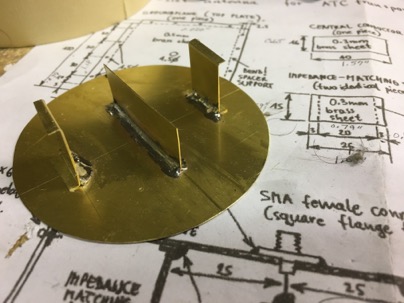
After soldering on the center rib, you attach the side supports. A cleco makes it easier to hold the rib in place.
Attaching the electrode is easier if you pre-wet the areas with solder, then hold the pieces together to connect the parts. After the center electrode is done, solder the side supports to the ground plane.
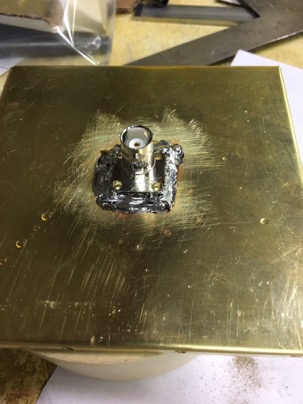
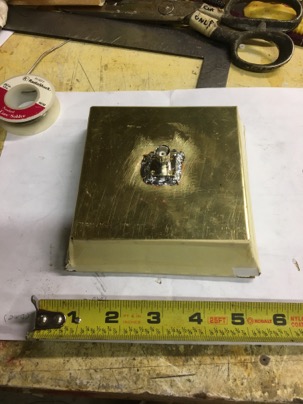
Done! I used a piece of card board to make a small enclosure case to protect the element and for testing.
Well the hurricane was fairly intense with lots of rain and very strong winds. We had 9” of rain in less than 24 hours with a max windspeed of 85 mph at the airport. Actually, it wasn’t all that bad at ground level and the newscaster said it was a category 1 storm.
If this was a Cat 1, I would really hate to be in a category 4 storm. I can already see there are a bunch of things I need to do to prepare for the next big storm.
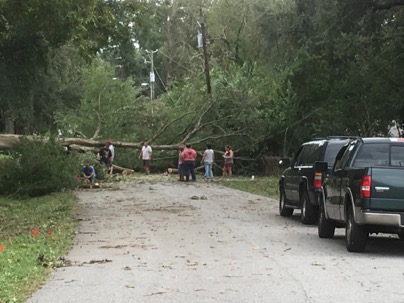
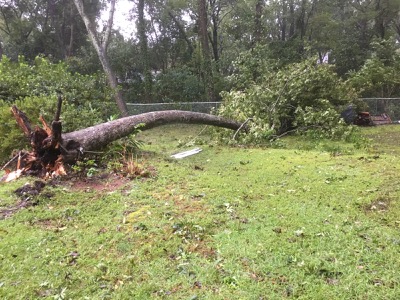
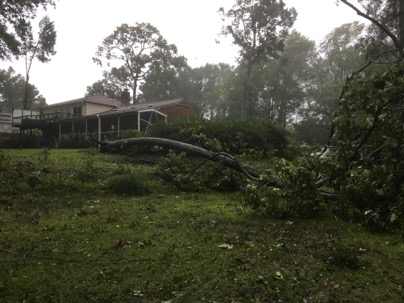
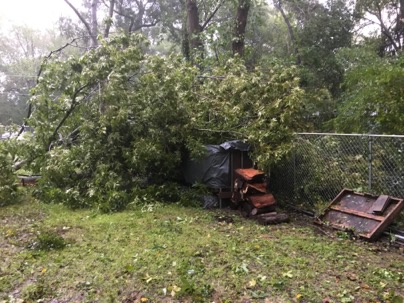
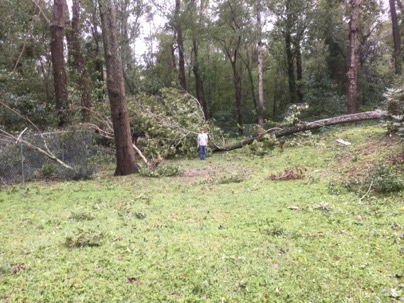
I did have some damage after all. The gently curved tree in which I used for hanging my freaking huge wind chime couldn’t handle the wind stress and came crashing down this morning. I really wouldn’t have cared that much, but it hit my fence and wood storage rack. I can’t complain because it is an easier fix than if the tree had hit my house. Other than a bunch of small limbs in the yard I came out fairly well.
Luckily, I didn’t loose power or internet at the house. Cant say the same for most of the neighbor, as a large tree took the power lines down for a large section of the neighborhood just down the street from my house. This tree was HUGE and probably 40” dia across at the base. They will need a crane to get out.
Here are a few shots of tree which came down in my yard….
As of right now, Friday, 9 pm the weather in Charleston, SC hasn’t been too bad. Lots of steady rain thorough out the day, since 1 pm. I would say 10-25 knt winds.
Hurricane Matthew is located somewhere between Jacksonville FL and Savannah, GA. The forecasters are still not sure if Matthew will pass east, slightly off the coast of Charleston or slowly turn out to sea resulting in a direct hit to Charleston with the eye wall. The eye wall is where the winds are the strongest, don’t cha know.
During 1989 Hurricane Hugo, the eye of the storm passed directly over my house in Charleston. It was really creepy to have the winds blasting from the east, then dead calm for about a few minutes. You could walk outside, no rain or clouds and the stars clearly visible. Ten minutes later the winds were blasting from the west with the same intensity. The two strong hits wind events, 180 degrees apart resulted in lots of damage Needless to say, I hope this one stays off the coast.
The real fun in Charleston will start about 2 am (tropical force winds). At 5 am we will get the the real hurricane force winds (>74+ mph). 5 am – 7 pm will be the worst period for the storm.
Fortunately, I live inland about 14 nm NW of the nearest coast line and am surrounded by dense tall woods on high lot with no chance of flooding. When I built the house, I engineered it with the Hugo experience in mind, so I am actually a bit excited, eager but also apprehensive about the next few hours. Sort of like your first flight in your home built airplane. How good are your building skills and will your survive the experience intact quickly races though your mind as the throttle is advanced.
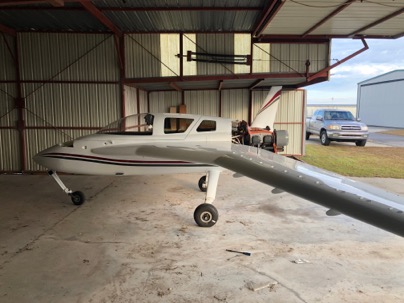
As far as my airplane, it is still safely tucked in my garage. Talk about crazy good fortune….
I have just completed a year long upgrade on the plane and had planned to take it to my hanger THIS weekend and reassemble it.
I am glad the last minute delays of life kept the bird home a bit longer than I had planned. My hanger at JZI is probably as old as I am and I dont have a lot of confidence it surviving a really bad storm. The only thing that matters at the airport is the wings and if they are damaged it is an easy repair, and heck and they needed to be repainted anyway. No big deal.
Time to close. I still have power and internet and want to make of the most of modern technology watching Luke Cage on Netflix before being returned to the middle ages using candle light at night to read a paper book for entertainment.
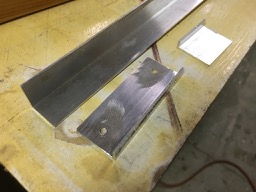
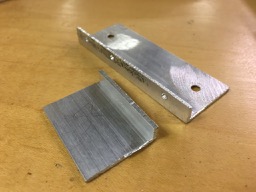
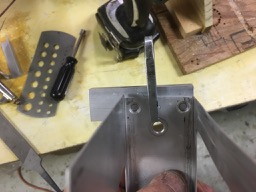
Next cut a piece of angle (thin, purchased at Home Depot) with the short bases the width of the separators in your panel.
They will end up looking like this
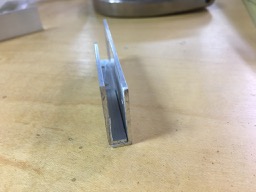
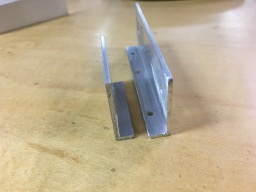
here you can see if you shorten one leg, they will nest on top of each other for a very narrow stack. In my case the separation between the radios is about 1/4”. In this case there is no way to use a screw and nut on the bracket to the radio can. It will have to be riveted.
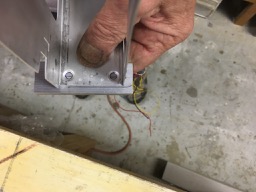
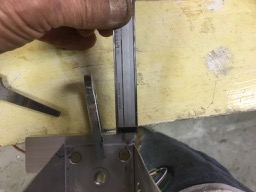
Using the hole location on bracket calculated, mark a line on the bracket,
verify the location
insure it is square, mark, remove the bracket and rivet it to the can.
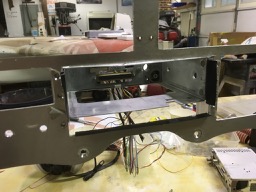
once it is the bracket is riveted to the can, you can clamp the can to the instrument panel, Put some heavy duct tape around the hole and insert your instrument to center in the instrument panel. The duct tape will protect the finish of your instrument.
with the radio in place, clamp the bracket to the panel and drill the mounting holes.
remove the can, install nut plates on the back side of the mounting brackets and reinstall. Then mount the can and check it out. Here you can see I added a strip of AL prior to drilling to simulate the mounting bracket which will be on the radio next to it since the brackets are nested together as shown above.
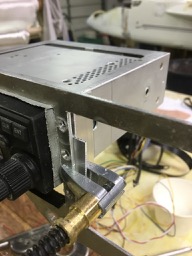
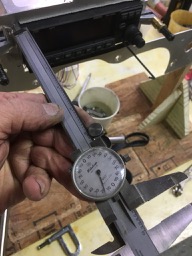
in my case, all instruments were level (perpendicular to the instrument panel) and within .010” of each other. A very easy install for a tight panel.
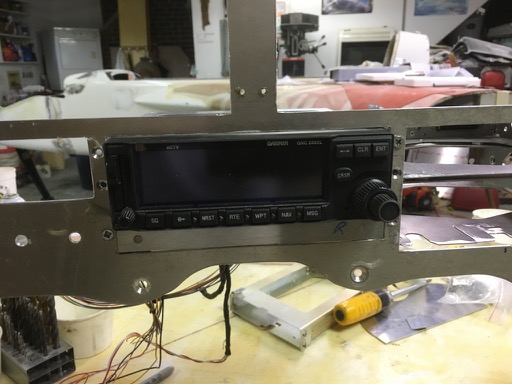
The final result. Nice….
LongEZ Upgrade | Nick | Comments Off on Building Tips: Finish Mounting Cans
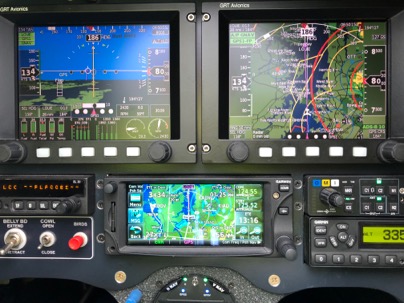 My current LongEZ, GRT installation.