Oct 27 2012

Making a perfect bread machine loaf

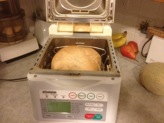
Every saturday, I have a tradition of making fresh bread and have been doing so for at least 15 or 20 years. I just love waking up to the smell of fresh baked bread on Saturday mornings. I haven’t bought sliced bread at the store in YEARS. It is crazy to think that I purchase this bread maker prior to getting out of the navy in 1977 when I was enlisted. The machine is still working!

Each loaf now comes out PERFECT each and every time.

wpid-IMG_3678-2012-10-27-21-482.jpg

For years I tinkered with hundreds of recipes and combinations of ingredients, , trying everything I could find in the kitchen to experiment with. Garlic bread with oregano, banana bread, soy flour, vegetables, nut bread, seeds, yogurt, sour cream, raisin brand, oat meal, you name it and I have tired it.

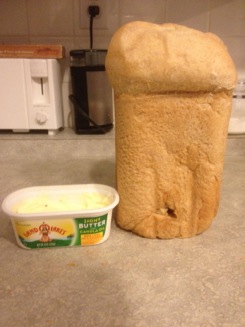
I finally figure out what it takes to make a terrific loaf of bread. It is part regular flour and whole wheat flour, has a nice firm texture and is constant dense firmness top to bottom.

wpid-IMG_3679-2012-10-27-21-48.jpg

The Perfect Bread Recipe

You need to layer the ingredients so if you use a timer the yeast does not activate. Put the ingredients in the pan in this order.

1/2 tsp salt
1 TBS sugar
1 tsp bread yeast
2 TBS instant cream of wheat
1 level cut of wheat flour
2 level cups of bread flour
Vegetable Oil (approx 1-2 table spoons)
1 1/8 C of water (Exactly)

Set the timer and your are done.

NOTES:

You must BE EXACT on your measurement. This is very important. Bread making is chemistry and your are only making one loaf so if you are off a bit with the ingredients the loaf will not come out perfect.

Here are two critical discoveries I found which impact the loaf quality.

  1. Cream of wheat for some reason helps improve the texture and density. It has made a world of difference in my results and works much better than gluten additives.
  2. The amount of water added is crucial successful results. Add one cup and the loaf will be dense and 2” shorter. Add 1 1/4 cut and it will be soft and smash itself against the glass top. WATER is how you control the size and density of the loaf.
  3. Don’t wash the bread pan. Just wipe it out and reuse. It keeps the non-stick surface working as it should.

Now that your perfect loft is made, eat the delicious first pieces with butter and coffee and store the remainder in a plastic store bag (like a grocery store bag). It is just right for keeping it fresh. The loaf will only keep on the shelf until 3-4 days and then it will need to be refrigerated. If I make my loaf on Saturday, by Wednesday, I’ll have to put it in the frig or it will develop mold.

You might also try the Land Of Lakes Lite Butter with canola oil. It spreads easily right from the frig, and was rated the best butter substitute by Consumer Reports and has a terrific taste.

Hint: Fresh bread is great for sandwiches, refrigerated bread is great for toast.

Oct 27 2012

Fuel Readout Frustrations

Today was a frustrating evening of my own making. Friday, UPS delivered my updated PMag (electronic ignition system) and a very interesting electronic readout from Aircraft Extras which will be used for my fuel probe system.

The PMag’s were tested and upgraded and they found there was NO problem with their operation, so they were not a factor in the vibration issue.

The Aircraft Extras electronic programable display is very cool. It is a tiny display (1”x1”)with the ability to monitor 6 inputs. It be using it to monitor Left and Right fuel level, the main and standby batteries, voltage output of the MAP ( the manifold pressure sensor) which according to Klaus is the best way to monitor power output when used for drag reduction testing and one left over for a spare which I’ll eventually hook up to something to be decided later..? I think after I finish with drag reduction, I’ll connect #5 and #6 inputs to the fuel probes too. This way one can not only get fuel display (my primary use), but I can also use #5,6 to display a RED flashing screen to display LOW FUEL. If that doesn’t get my attention, nothing will! This little display and monitor anything with a voltage output and has LOTS of different display screens to chose from. I may use it to monitor belly board position, oil pressure or ??

wpid-FuelGauge-300-2012-10-27-20-58.jpg wpid-PastedGraphic-2012-10-27-20-582.tiff

A very small system. I only wish it could monitor more inputs (like 16 or 24) instead of just 6. It could be used to monitor anything electrical in the plane. Very cool little device.

wpid-PastedGraphic3-2012-10-27-20-582.tiff wpid-PastedGraphic2-2012-10-27-20-582.tiff wpid-PastedGraphic1-2012-10-27-20-582.tiff

Naturally, after receiving the AG6, I wanted to test it at home, get comfortable with the programing and operation before installing it in the plane. Ended staying up past midnight last night messing with the display to set it up for my needs. The AG6 VERY easy to configure and program once you get past how the software programing functions.

wpid-CIMG1567-2012-10-27-20-58.jpg

Low and behold I couldn’t get it to work quite like it should. I could tell it was alarming and functioning but there was no backlight color when it was alarmed. A red flashing display is very important to me for the intended use in the plane. The Princeton electronics in the test cell fuel calibrated and worked perfectly but not the readout.

wpid-CIMG1570-2012-10-27-20-58.jpg

This morning it was up early for more testing, more calls to the designer and finally sending him the data settings for evaluation.

Overall it is my goal is to develop a small, complete package of a fuel probe and a readout system for those canard flyers who don’t, won’t, or can’t upgrade their planes to latest Glass Panel type displays. Something that can be easily installed in any canard even if one has very limited panel space (like my plane).

Overall, this is no different from developmental pains of designing the probes. It took almost a year of going back and forth with Princeton Electronics to get the level sensing electronics module working properly. I really like the small foot print of the readout and can’t wait to get it calibrated and working in the plane. It is just a matter of figuring out what is wrong with my setup. After the proper configuration for the fuel level alarms (1/4 tank, 1/8 tank) is determined, the designer will configured and saved the program file so when a canard owner buys one of his readouts for my probes, it will be pre-programed to my specifications so it can be used right out of the box with no fiddling.

After a morning of frustration, it was off to the airport to modify the instrument panel for the readout, wiring and mounting of the electronics which will ultimately occur when the display is working properly. I want to do as much tomorrow as I can as on Tuesday (after install my hydraulic lifters delivery on monday) as it is going to be COLD here (high in the 50’s) which is the result of the Hurricane Sandy which is moving through the area today.

NOTE: After returning the display and getting a new one, I found out that the original display was working perfectly and it was my fault the backlighting (alarms) were not working…. I DIDNT hook up a small jumper wire which powers the light of the display. No backlight power, no colored alarms! Sometimes I am amazed at my ability to frustrate myself.

After reviewing the installation instructions I found my mistake, hooked up the jumper and all the backlight functions of the display worked as designed. The good part of the story is I found the designer was very helpful at trying to solve my self induced problem, and I learned a lot about how to use and program the display.

Watched 3 episodes of a new show on CW called “Arrow”. It is taken from the comics and is about a man who is fighting crime in the city with a bow and Arrow. Sort of like batman with a bow. Actually, it is nicely done.